Deepthi is the Founder of dbanuggets and a SQL Database Administrator. As a Microsoft MVP, she helps SQL communities by sharing her expertise in resolving SQL Server problems globally.
This will be the last post for this year – writing this a few hours before the end of the year! I will keep this short and not boring.
Would like to thank you all for staying with me along my learning Journey. You are the main reason why I still continue to write these posts. Thank you and Thank you!!
As I look back at the year 2023, the main thing I can say is, that it was super fast. I still remember the day I wrote my 2022 year-end review. Time flies so fast and we get older quick.
I would like to reflect on this year as per my professional growth and personal growth.
Professional
Community Speaking and Other Engagements
Spoke at many local user groups and International conferences like SQLBits and PASS Summit 2023.
Published 17 blog posts in the year 2023 with 17.2K views and 11.7K visitors for this year. Totally, dbanuggets crossed over 56.6K all-time views and 36K visitors.
Personal
I was interested in learning philosophy for a very long time. I had started educating myself on Stoic philosophy starting with Marcus Aurelius Meditations. Started listening to Rober Greene Audio books on Audible starting with The 48 Laws of Power. Recently fell in love with J. Krishnamurthy’s philosophy, this is my all-time favorite I can say because I am finding answers to some complex questions about life and I truly believe Krishnamurthy has answers to my questions. Really enjoying his hour-long lectures.
I am looking forward to continuing to publish more blog posts, community work including speaking engagements, and Mentoring in the year 2024.
To all you wonderful people who read all the above lines and reached this section of this post – These are a couple of the things I learned about life this year. Would like to share some of them here.
Live this life as much as you can – cause you don’t have any other lives to jump into. No matter how much you feel this life sucks, you are traveling on your own road (your life). Stop looking at the other roads cause you don’t know where they turn and how far the other roads lead. Those roads have their own bumps, speed breakers, and dead ends. Focusing on our road is the only way.
If you are trying to solve any particular issue in your life, try to examine it and do research on the issue. Fear disappears once you understand what the issue is. You can find books, and videos talking about the issue in detail. As you do the research, you will find you are not the only one having the same issue – which in itself solves half of your worries. Along the way, you might find a community of people trying to solve the same problem or achieve the same life goal.
Do not bother about what others think of you. Don’t take other people’s negativity towards you personally. They do not know you, your dreams, your ambitions, and the work you do while they are not watching you. Have empathy towards them. They may be going through a lot in their lives and have many insecurities in their lives.
No matter how big of a problem you are facing, many people may be going through the same exact problem at the same time as you. We are the human species that lived on earth for 200,000 years. Problems do repeat themselves but as we are more focused on our own lives, we feel we are the only ones facing the issue.
See your problems from a broader picture – most of the time, you will end up realizing you are giving greater attention than it needs.
At the end of our lives, none of these problems matters.
Deepthi is the Founder of dbanuggets and a SQL Database Administrator. As a Microsoft MVP, she helps SQL communities by sharing her expertise in resolving SQL Server problems globally.
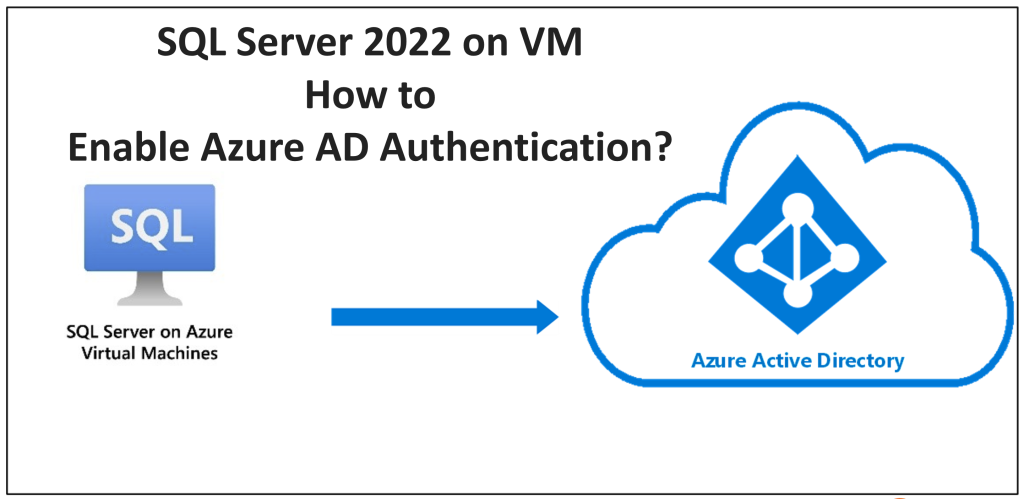
To enable the SQL Server 2022 on a virtual machine to use Azure AD, we need below things:
Managed identity and its permissions to query Microsoft Graph: When you enable the AD on the SQL Server 2022 and create the Azure AD login and that user trying to login, the managed identity will be used to Query the Microsoft Graph and that is the reason we need to give this identity the permissions to Query Microsoft Graph. The security of this managed identity is at the resource level. Here the resource is a Virtual machine.
To set up the Azure AD authentication for SQL Server on VM, we can do this by using System-assigned managed identity or User-assigned managed identity.
System-assigned managed identity is easy to manage and configure as this identity will be deleted when the VM is deleted. It will have validity until the VM has its life whereas the User-assigned managed identity will be used at scale for many SQL Servers on the virtual machines.
In this post, we are learning how to enable the AD authentication to SQL Server on VM. So, we need the SQL Server 2022 which is installed on the Azure VM and we will have to register the Windows SQL Server VM with SQL IaaS Agent extension.
Permissions:
These are the below permissions needed to connect the SQL Server to VM to the managed identity:
User.ReadALL, GroupMember.Read.All, and Application.Read.All.
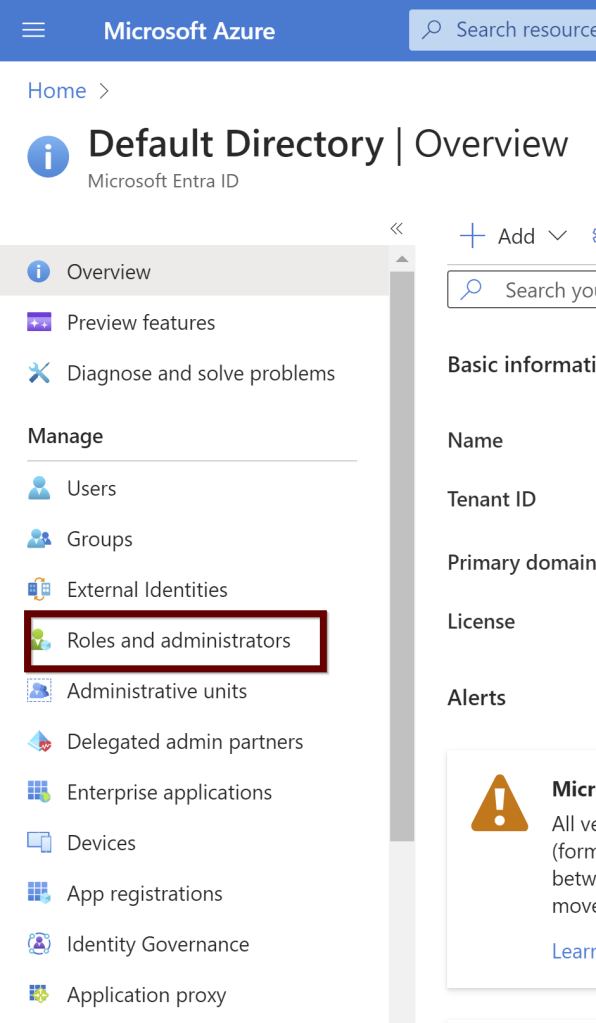
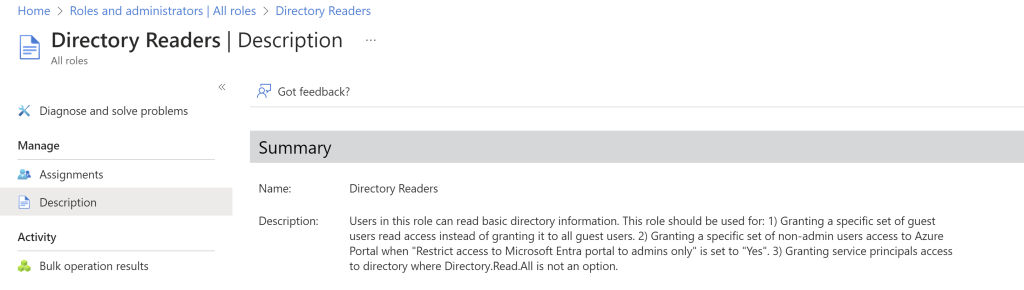
The managed identity must also have Active Directory reader permissions. Search for the Microsoft Entra ID
Under the default directory, click on the roles and administrators
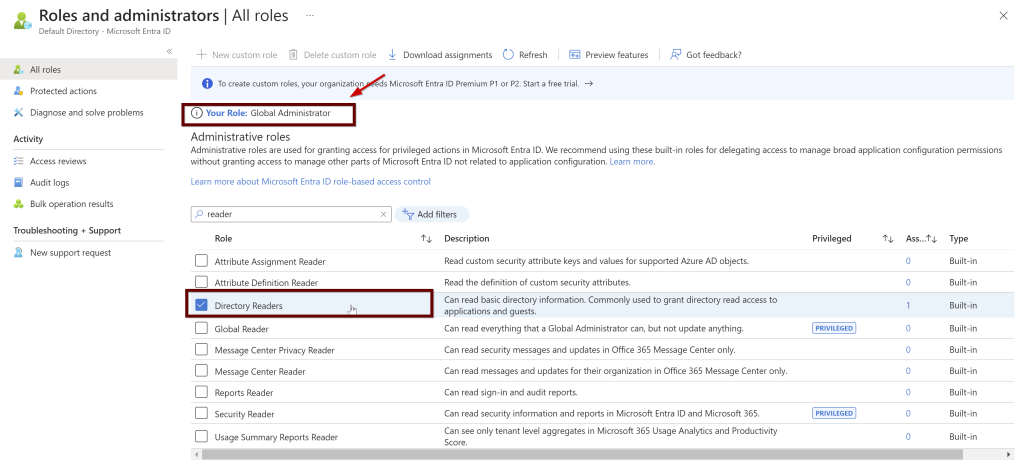
Make sure you have Azure AD Global administrator permissions before giving the identity the reader permissions to the Azure AD
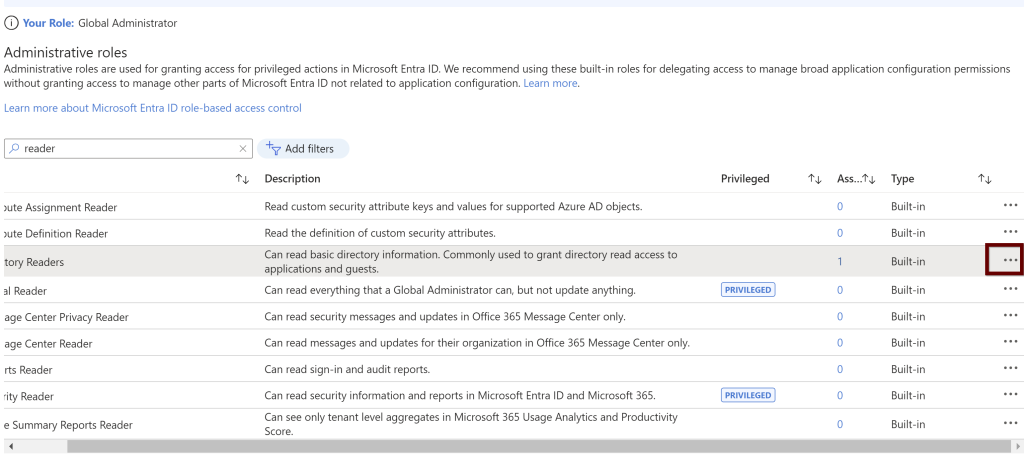
If you scroll your bar right side, you can see the ellipses button. Click on that to see the description of the role
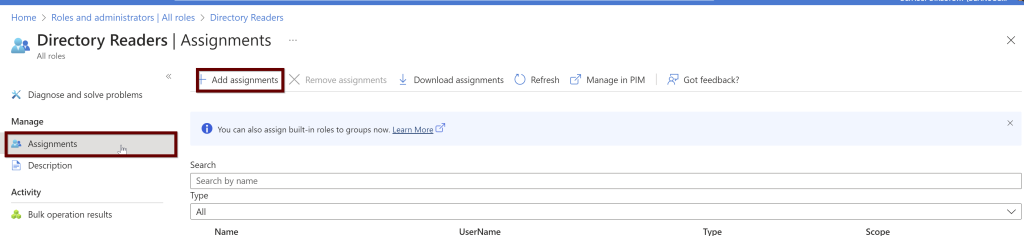
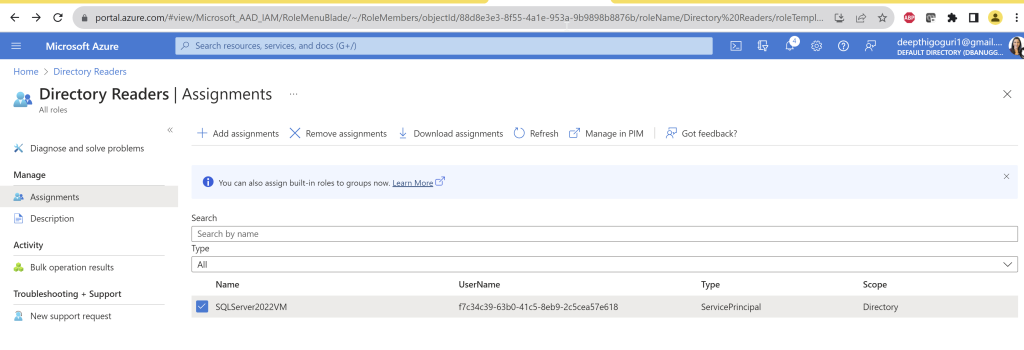
Under the directory readers, click on assignments and then click on add assignments
From the list, choose the VM name if you want to use the system assigned managed identity
Click on Add at the bottom of the page
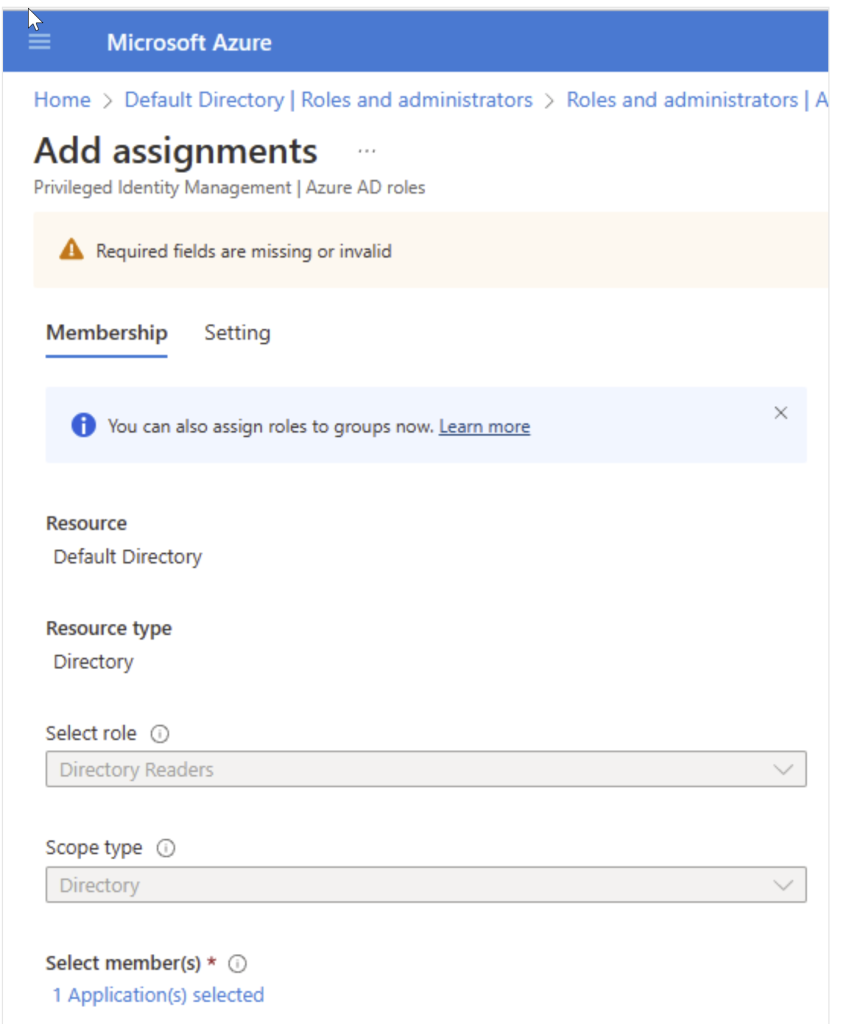
You will see the below screen. Make sure the application (VM name) is mentioned under the select members. This is if you choose the system managed identity. Click next.
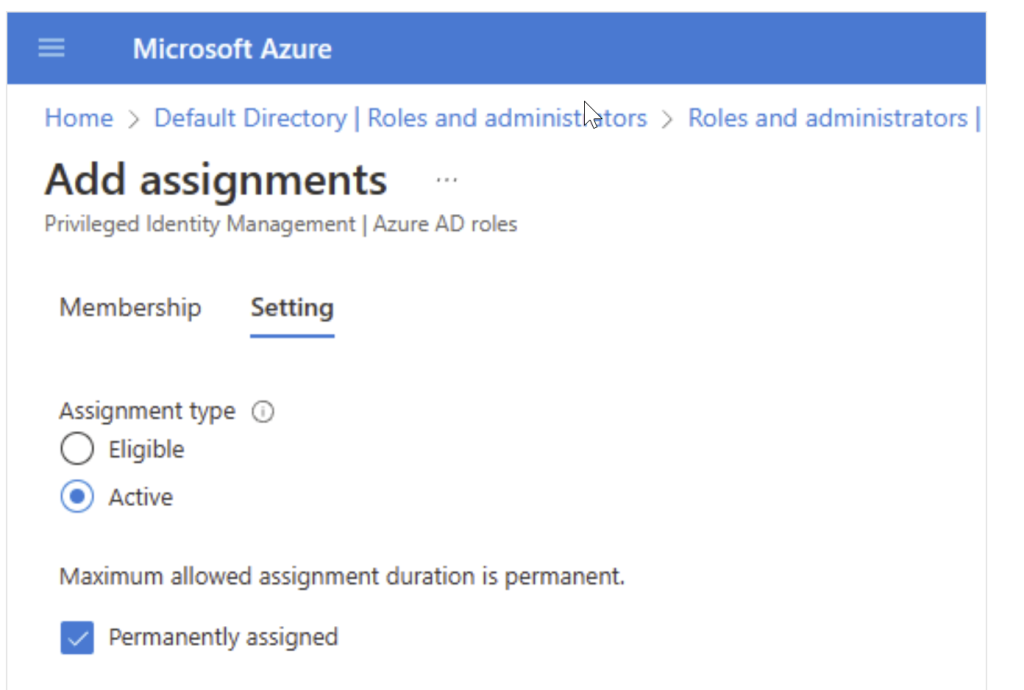
As you click next, you will see the below screen. Make sure the assignment type is active and click on the box for permanently assigned. At the bottom of the screen, you will see the assign button. Click on that.
Under the directory readers, you will see the vm system assigned identity is being added.
If you want to choose the user-managed identity, choose it.
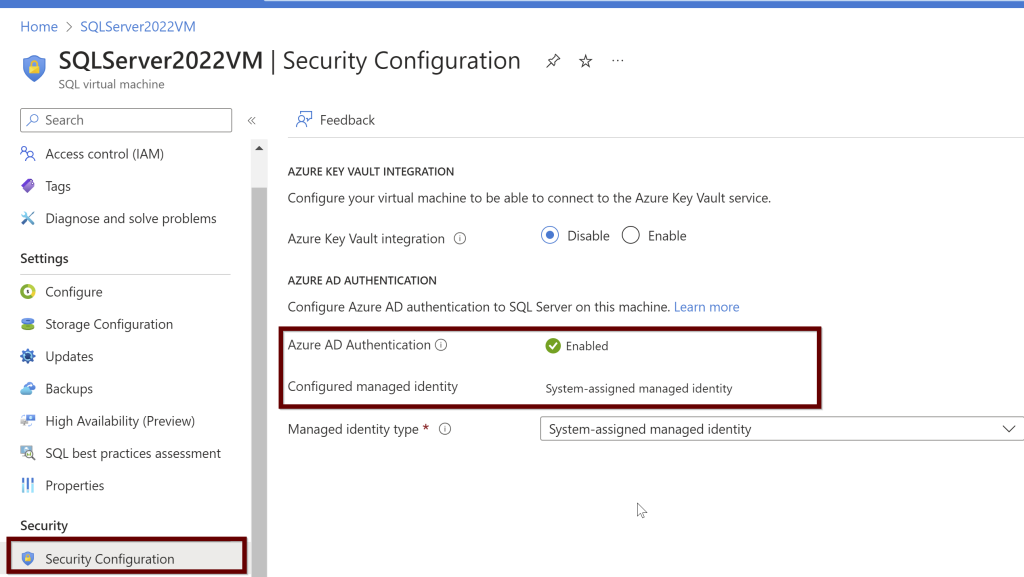
Enable the Azure AD authentication in the Azure VM
Under the SQL virtual machine (Make sure your VM is turned on and the SQL virtual machine is online as well to see the enabled security configuration option in the left blade under the security tab). Enable the Azure AD authentication. Here, I already enabled it earlier and so you see it as enabled.
Remember: Once you enable the Azure AD authentication, you cannot disable it.
If you want to enable the Azure AD authentication, you will see the below screenshot. Click on enable and hit apply at the bottom of the page.
In this blog post, you have read the process of enabling the Azure AD authentication on Azure VM. Only Windows Server 2022 VM’s are supported to enable the Azure AD authentication with the SQL IaaS Agent extension.
Thank you for reading!
References:
Microsoft article – Enable Azure AD authentication for SQL Server on Azure VMs
Deepthi is the Founder of dbanuggets and a SQL Database Administrator. As a Microsoft MVP, she helps SQL communities by sharing her expertise in resolving SQL Server problems globally.
SQL Server 2022 on-prem on Windows and Linux and SQL Server 2022 hosted on Windows Virtual Machines.
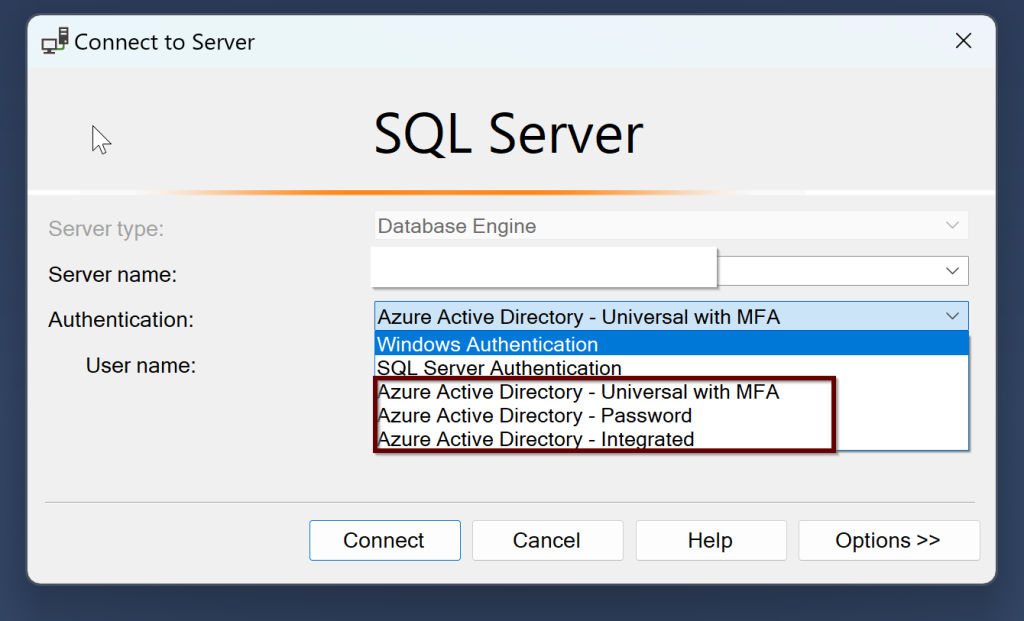
Once you install the SQL Server, there are three different authentication methods that you can use to connect SQL Server along with the Windows and SQL Server authentication. They are –
Azure Active Directory Universal with Multi-Factor Authentication
Azure Active Directory Password
Azure Active Directory Integrated
If you join the Windows Server Active Directory and Azure Active Directory, then you can use both the Windows login and Azure AD login to SQL Server.
Remember:To connect your SQL Server to Azure AD, your SQL Server and the host that runs the SQL Server should be registered in Azure Arc. If you have not already connected your SQL Server to Azure Arc, here is a step-by-step guide to do.
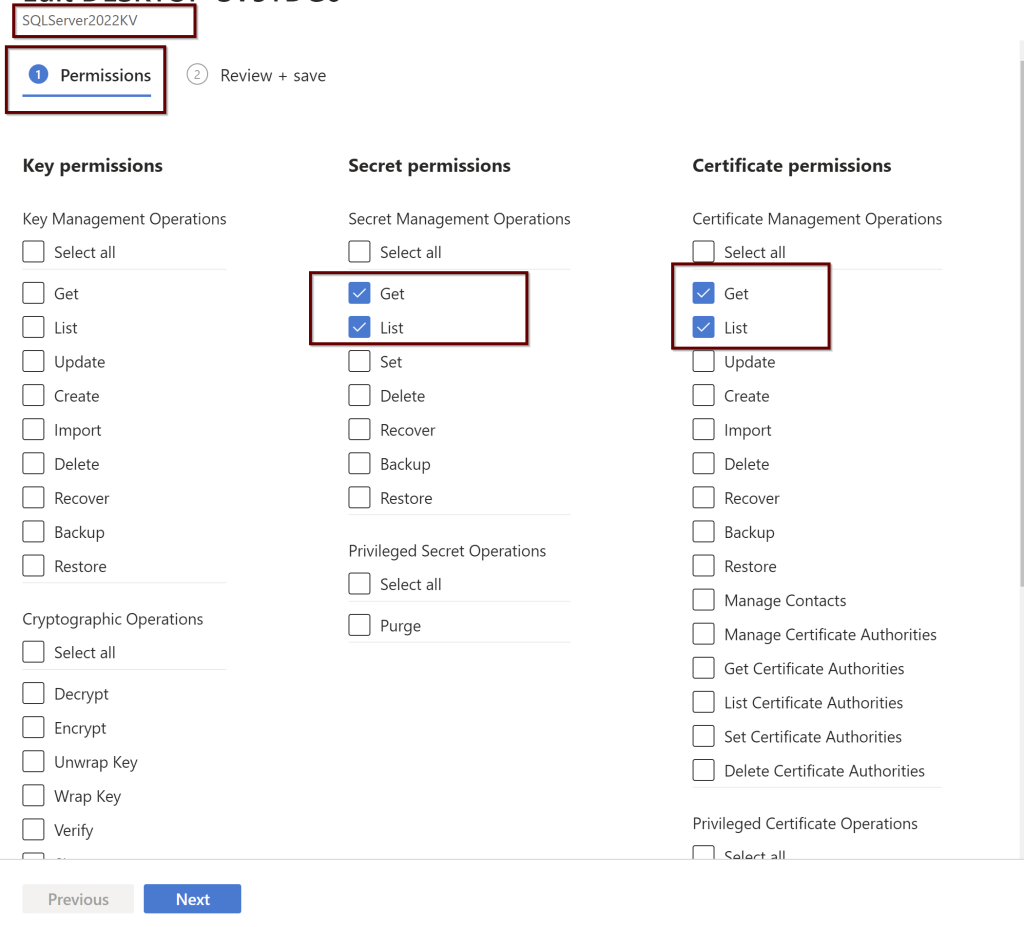
The user that is used to set up the Azure AD should have the contributor role for the server and on the Keyvault.
Prerequisites:
When installing the SQL Server 2022, the extended functionality in Azure will automatically install the Certificate that is stored in the Key Vault and Azure AD application automatically as we create the Azure AD admin for SQL Server.
Setup Azure AD admin
The account that is being used to create the Azure AD admin account must be in the contributor role for the KeyVault and for the Server as well from the Azure Arc.
Permissions are shown under the Access control (IAM) under the KeyVault
Permissions as shown under the Access control (IAM) under the SQL Server-Azure Arc
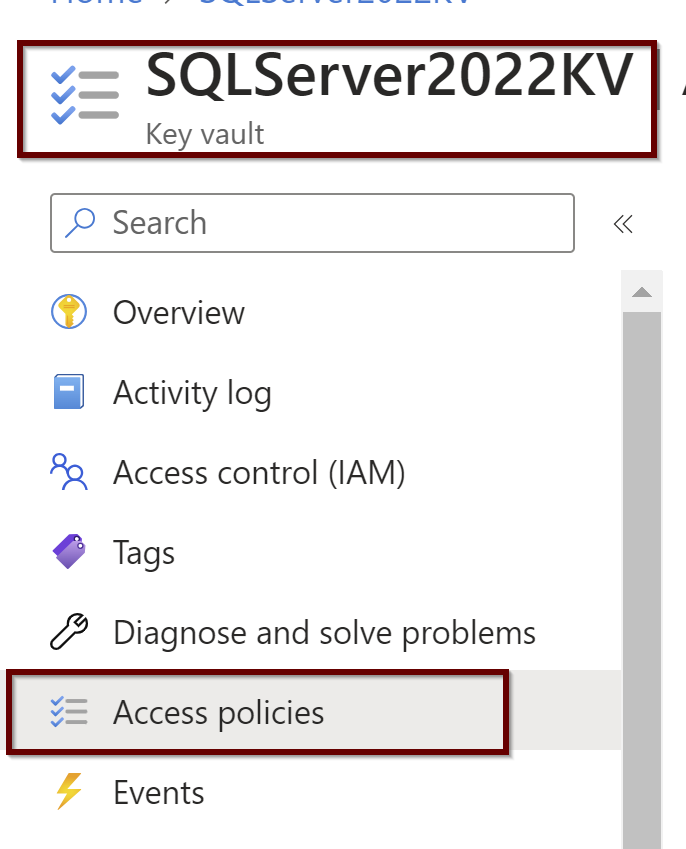
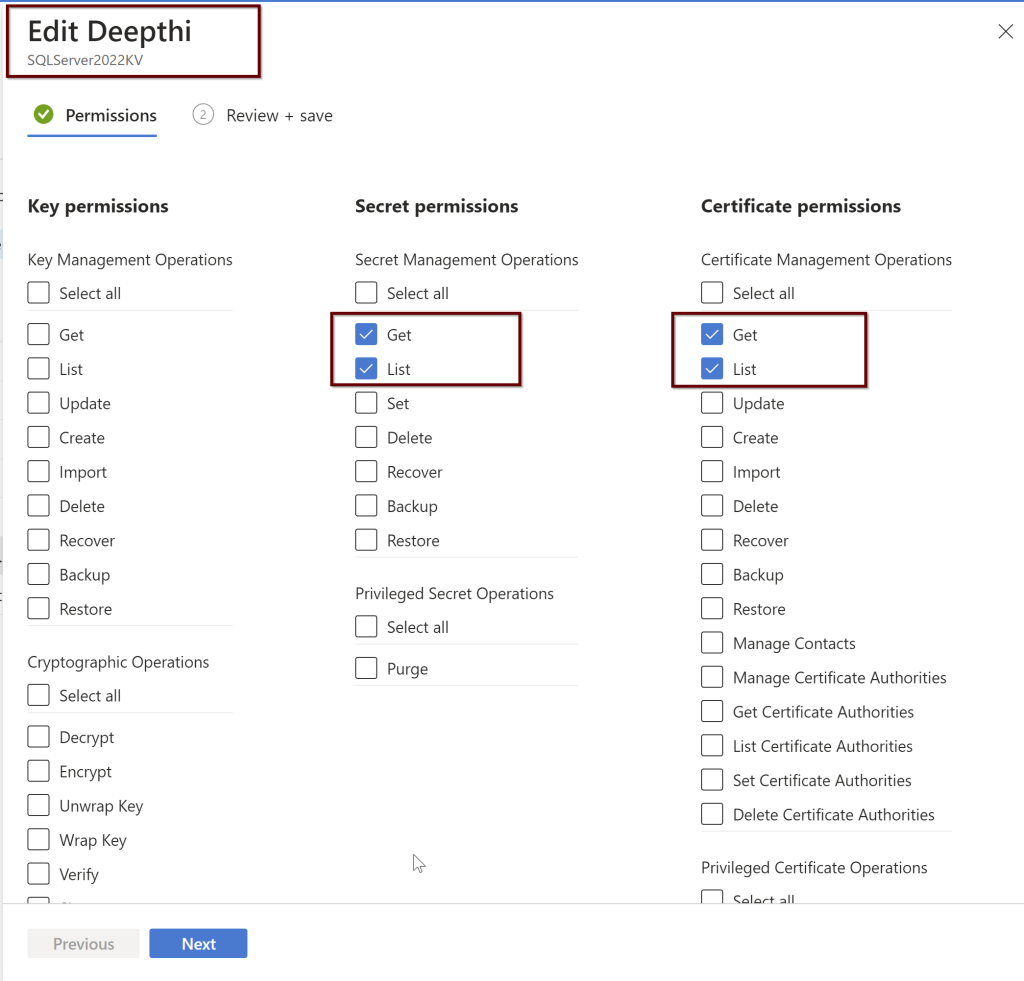
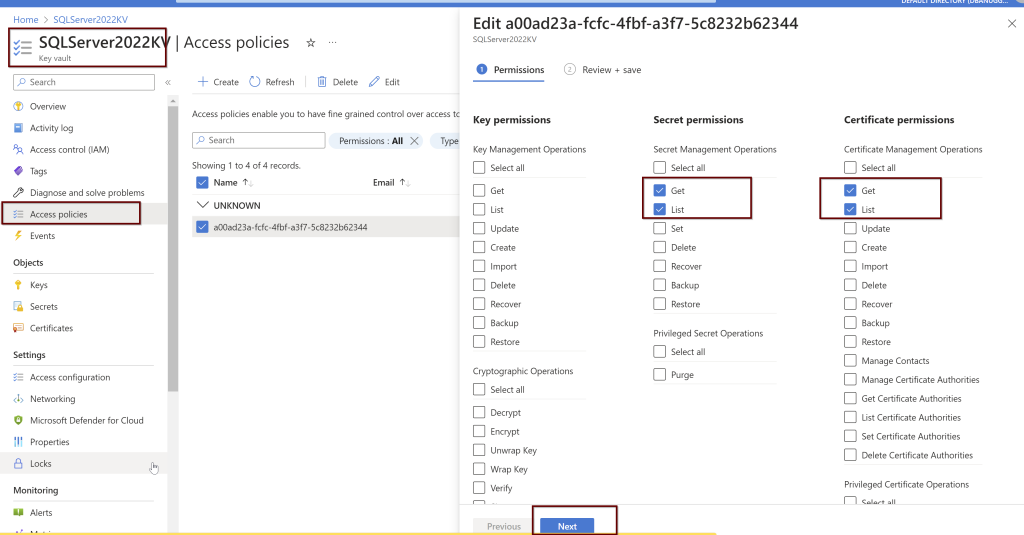
Setting up the Access Policies under the KeyVault
Under the Key vault, select the permissions as shown below. You will find these under the Access policies within the KeyVault
Figure 1
Setting up the Access Policies under the Azure AD users
Figure 2
While setting up the Azure AD admin, portal functionality will automatically create the Key vault certificate and the Azure AD application registration but you can also manually create your own certificate and also setup the Azure AD application registration.
You can create the Azure AD admin user using the portal/PowerShell/Azure CLI/ARM template. If you are creating using the ARM template then you need to create the Key vault certificate and Azure AD application before setting up the Azure admin.
Azure AD admin setup for SQL Server
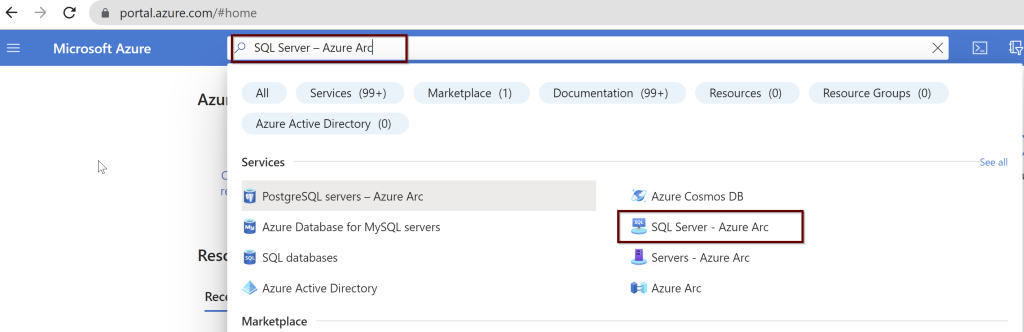
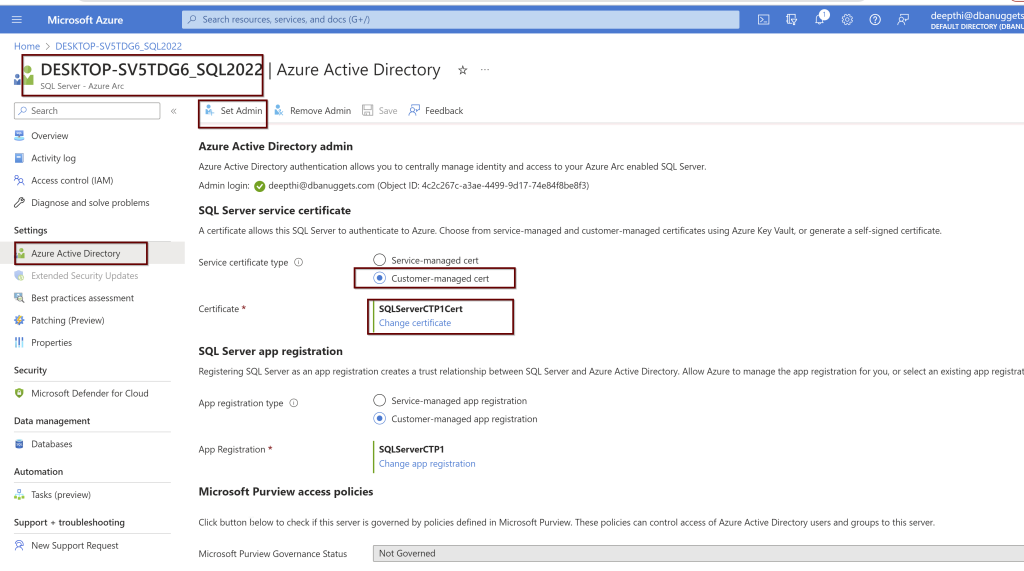
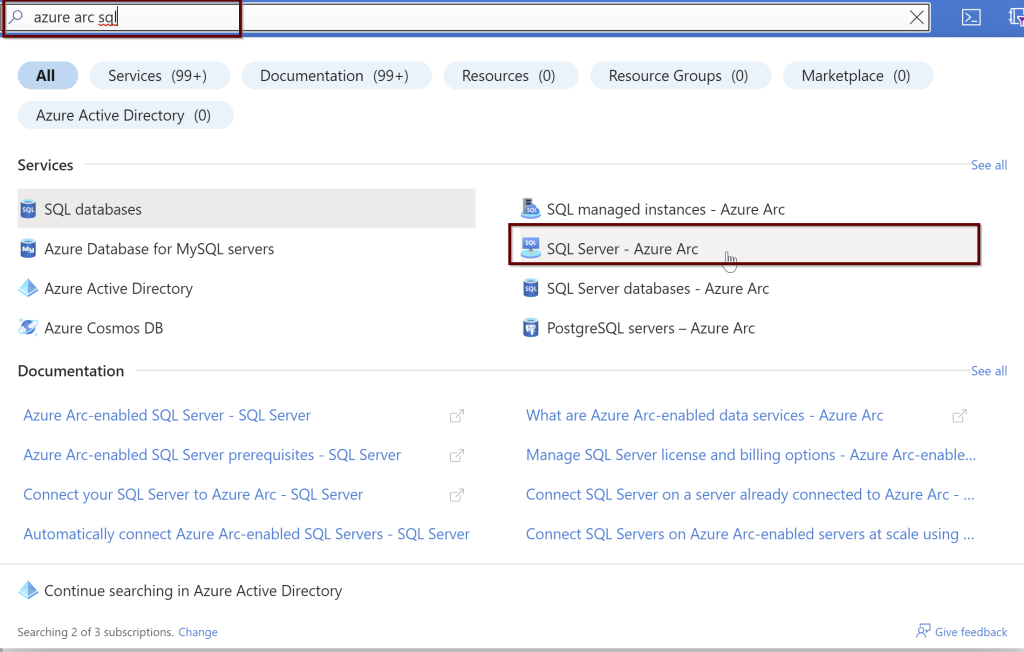
In the Azure portal, search for “SQL Server – Azure Arc” and select it from the services listed.
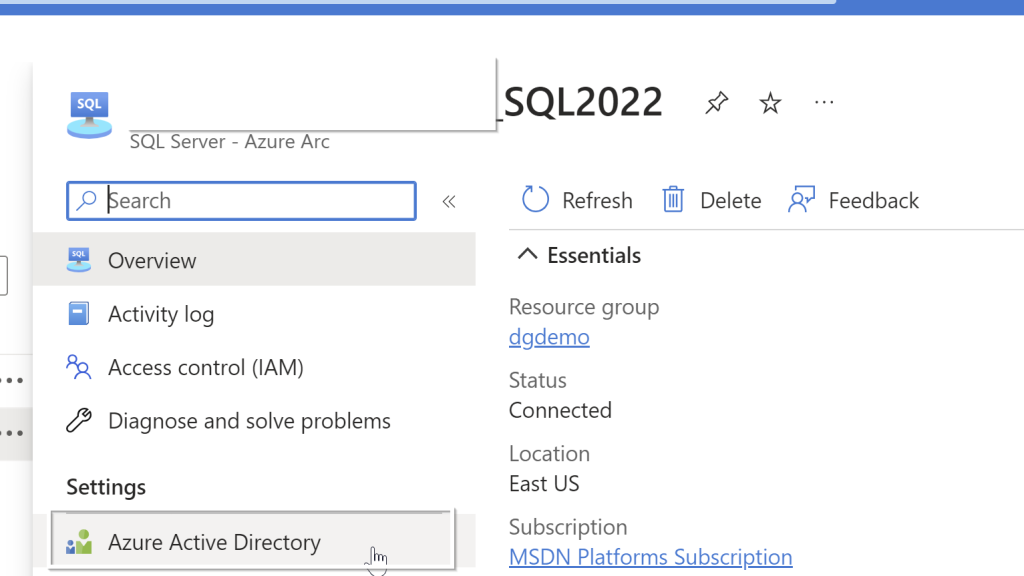
Choose the Azure Arc SQL Servers registered. Select the Active Directory from the left side pane.
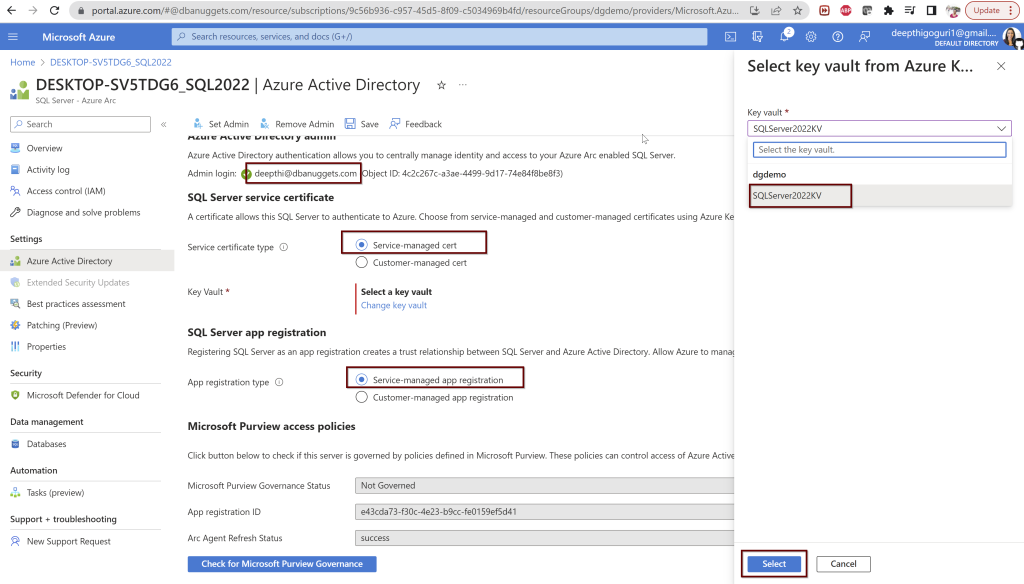
Select the user you want to use and select the Service-managed cert and Service-managed app registration. For the key vault, select the key vault and click select. Once you choose these options, click on Save at the top. If you followed all the steps correctly from the beginning, you should not see any errors.
During this process, a call is sent to the Azure Arc agent which will then configure the Azure AD authentication for your specific SQL Server instance. This process will take a couple of minutes to complete.
So while this process is going on, there are certain things that will happen automatically behind the scenes.
The certificate is created in the key vault you selected with the name format hostname-instancename-uniquenumber as shown below
The Azure AD application is created with the name in the format of hostname-instancename-uniquenumber as shown below.
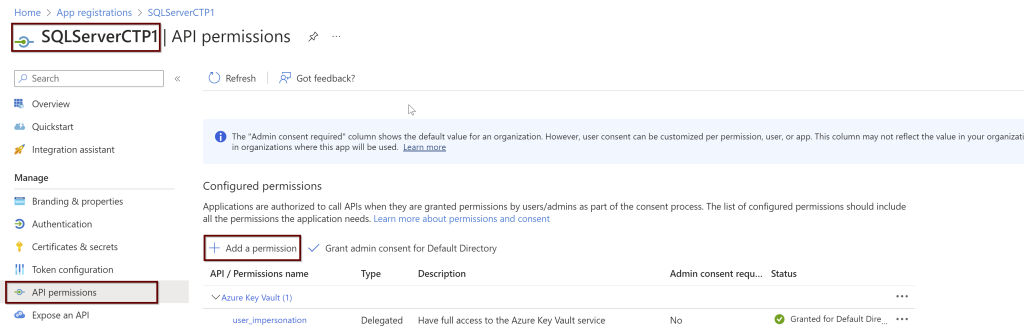
The necessary permissions also will be granted to this application automatically. To see what permissions are provided, please look for the steps below:
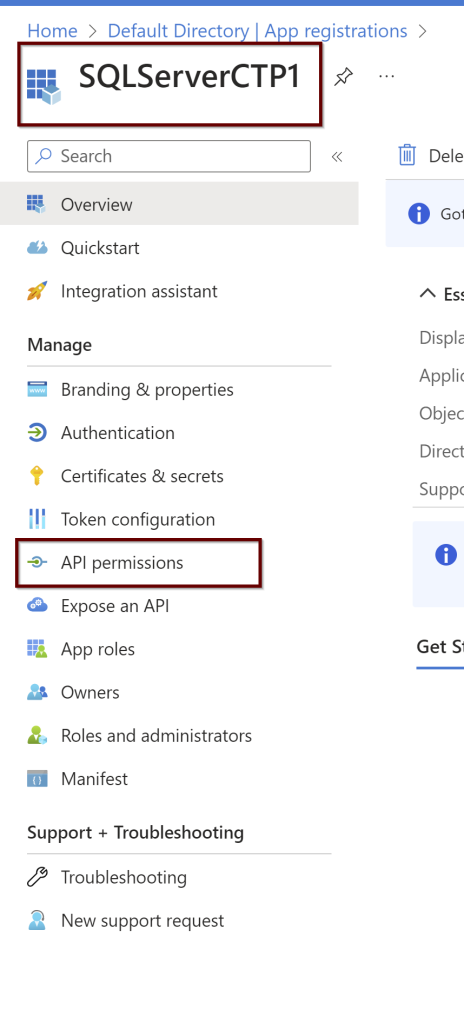
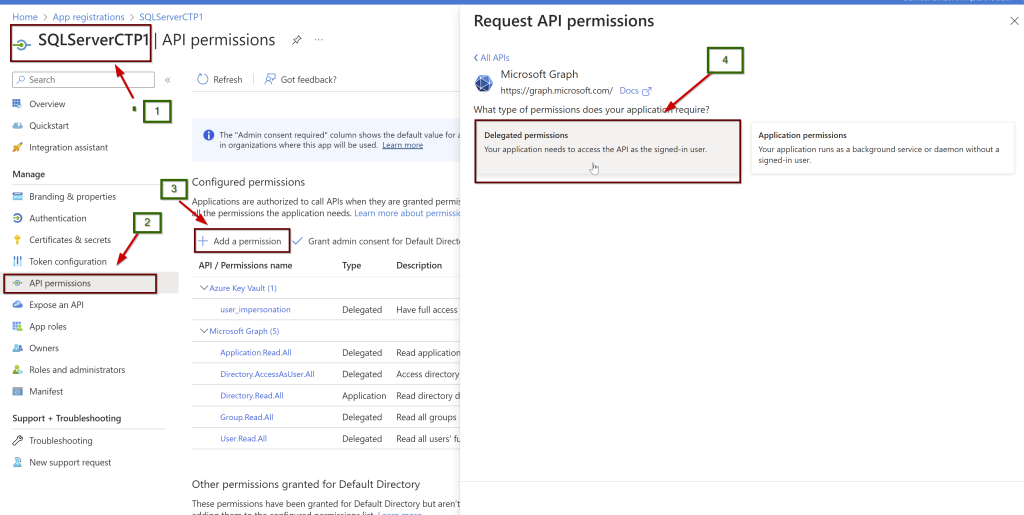
Open the application (here, I am using the manually created application name SQLServerCTP1. Once you open the application, in the left side pane click on API permissions.
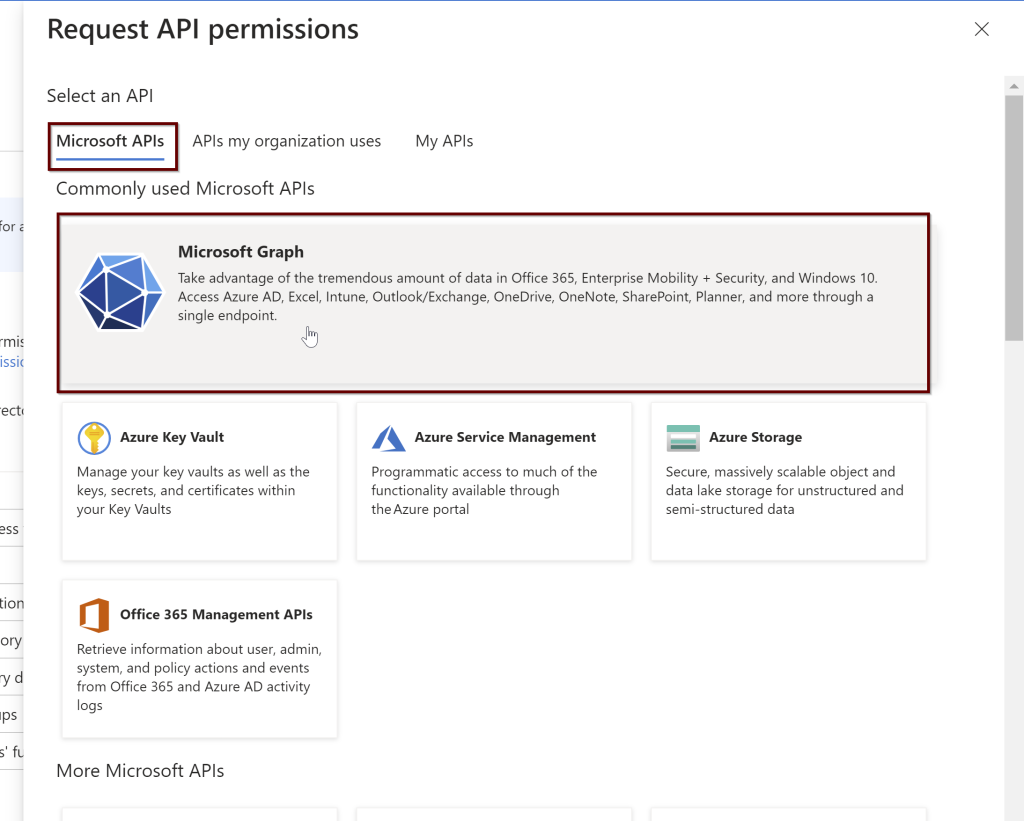
Click on the Microsoft Graph and request API permissions (see a couple of screenshots below)
3. Then the certificate from the Azure Key Vault is assigned to the application and saves all of these settings to Azure Arc.
Remember: The certificate created automatically is not managed and rotated by Microsoft. It is up to the customer to manage the certificate. For that reason, we can also create our own certificate along with the application for Azure AD admin setup. Follow the below steps to create your own certificate and application.
According to Microsoft docs, Steps that need to install Azure AD to connect to SQL Server are:
Create and register an Azure AD application and Grant permissions to the Azure AD application
Create and assign a certificate
Configure Azure AD authentication for SQL Server through the Azure portal
Create logins and users
Connect with a supported authentication method
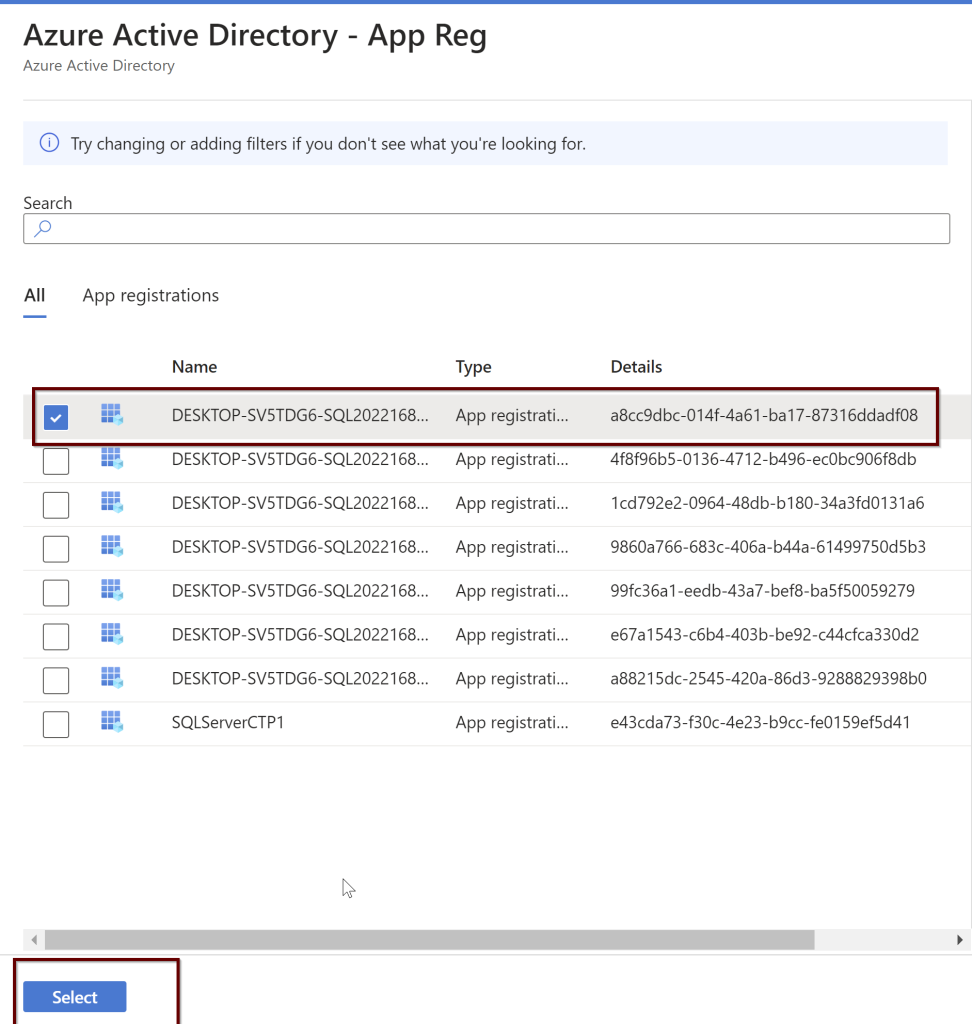
Create and register an Azure AD application
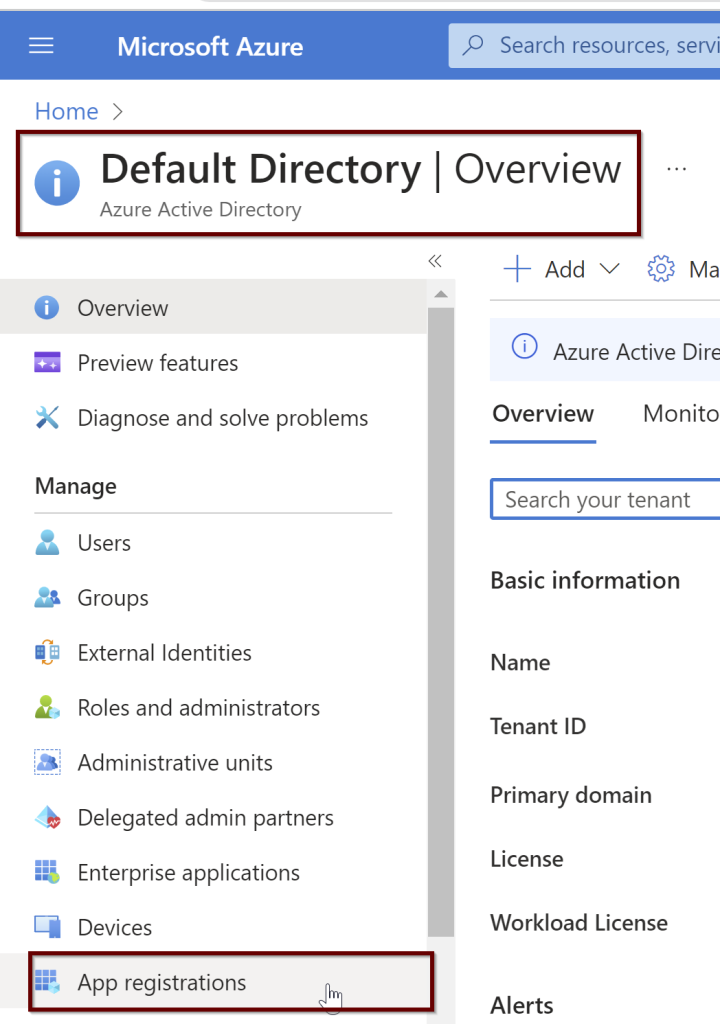
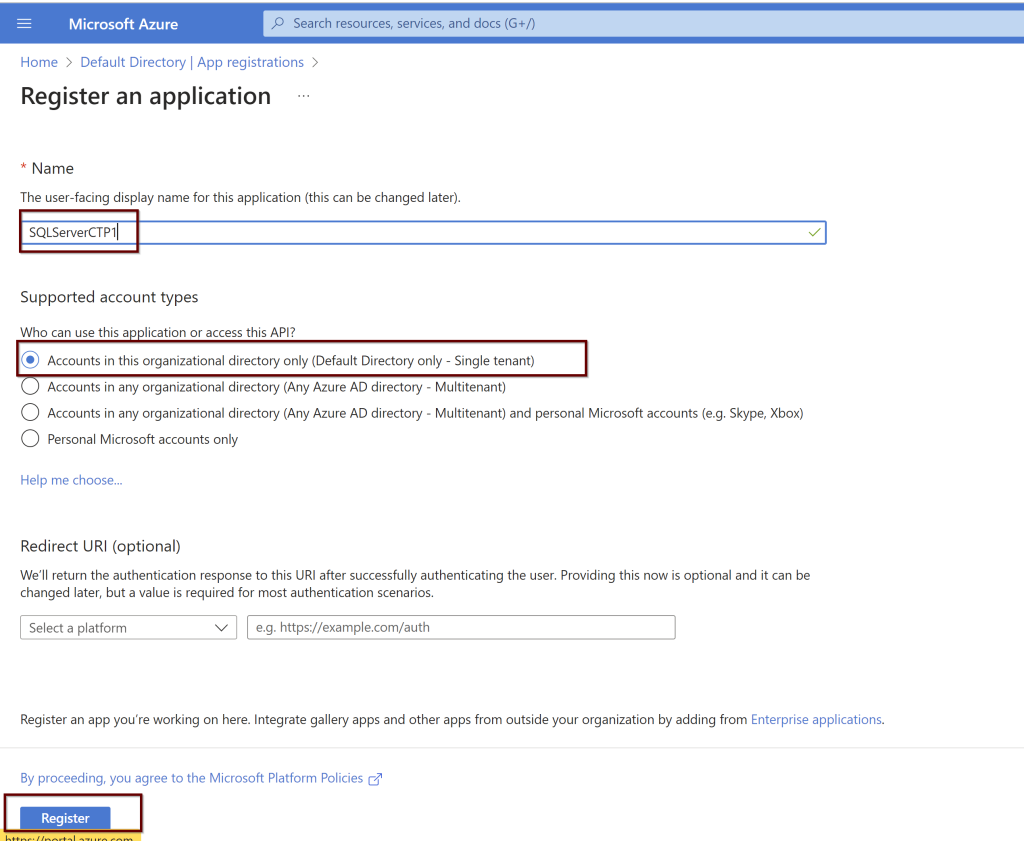
In the Azure portal search bar, search for Azure Active Directory and then choose App Registrations from the left pane. Then click on New registration
Go to the application. On the left side pane, click on the API permissions.
Next, give all the permissions needed for the application. Select the Microsoft Graph
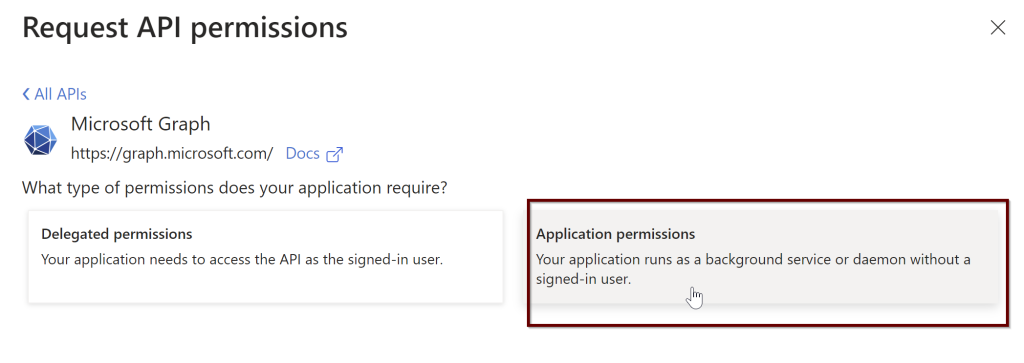
Click on the application permissions
In the search bar, select the Directory.Read.All and select the permission and click on add permissions.
Follow the same steps again. Go to the application> left side pane select API permissions> Microsoft Graph> Delegated permissions
Select all these and grant admin consent. As per the Microsoft doc, the user that giving the permissions should be a part of Azure AD Global Administrator or Privileged Role Administrator.
Application.Read.All
Directory.AccessAsUser.All
Group.Read.All
User.Read.All
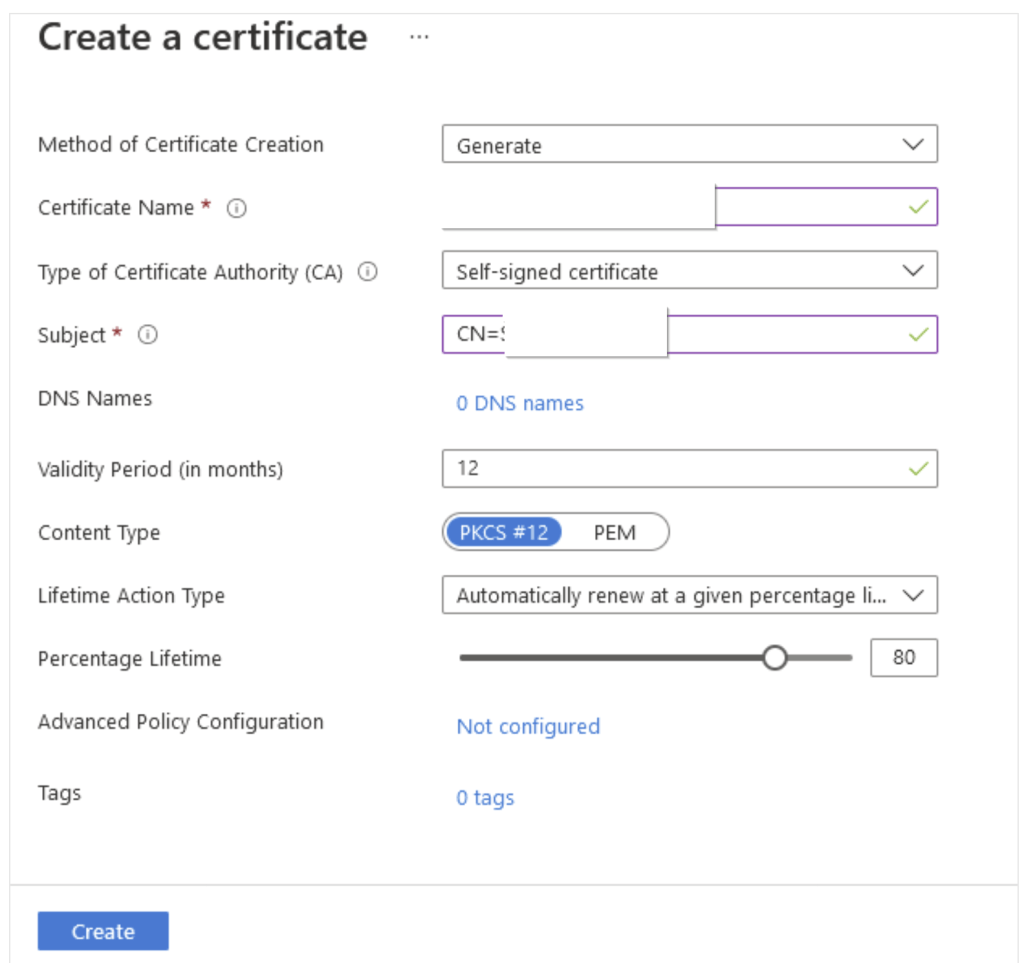
2. Create and assign the Certificate
Go to the Key Vault account if you have it ready to place the certificate. If you don’t have one, create one. Here I already have it.
Click on Generate/import > Give the certificate name. Check for the validity period and by default it is 12 months which is recommended. rest all the options as is as per default values and click Create.
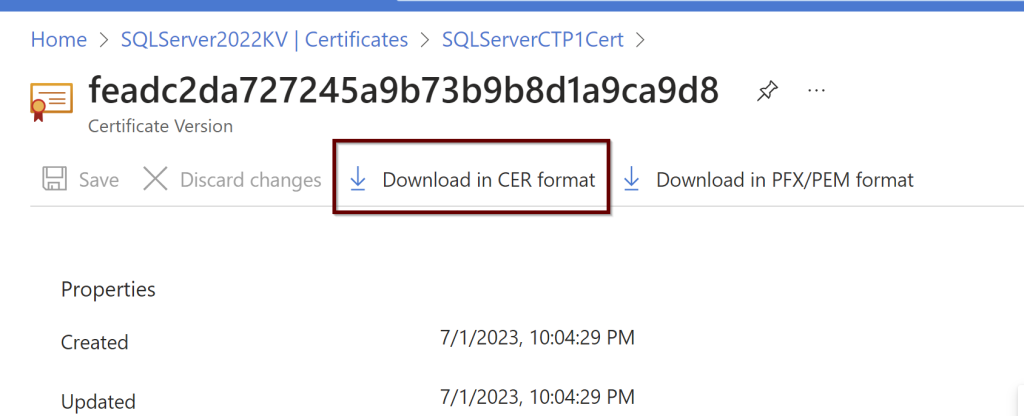
Click on the certificate later to see if it shows online. If it doesn’t please refresh the page to see it online. Download the CER format of the certificate. You need this download to upload to the certifications under the application.
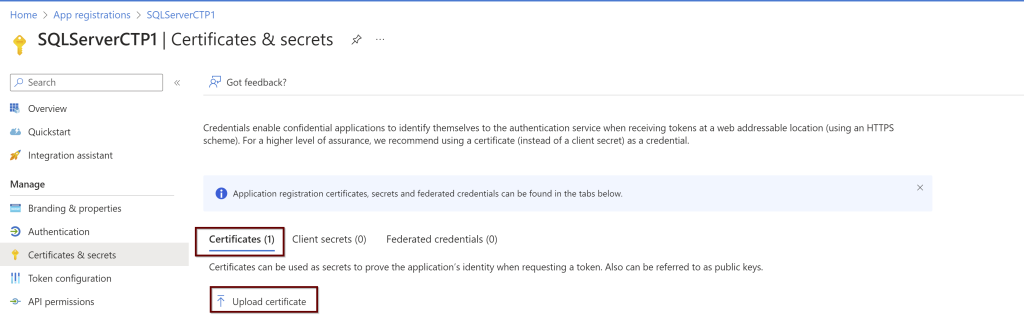
Go to the application that was registered page. On the left pane, click on the certificates and secrets. Under the Certificates click on upload
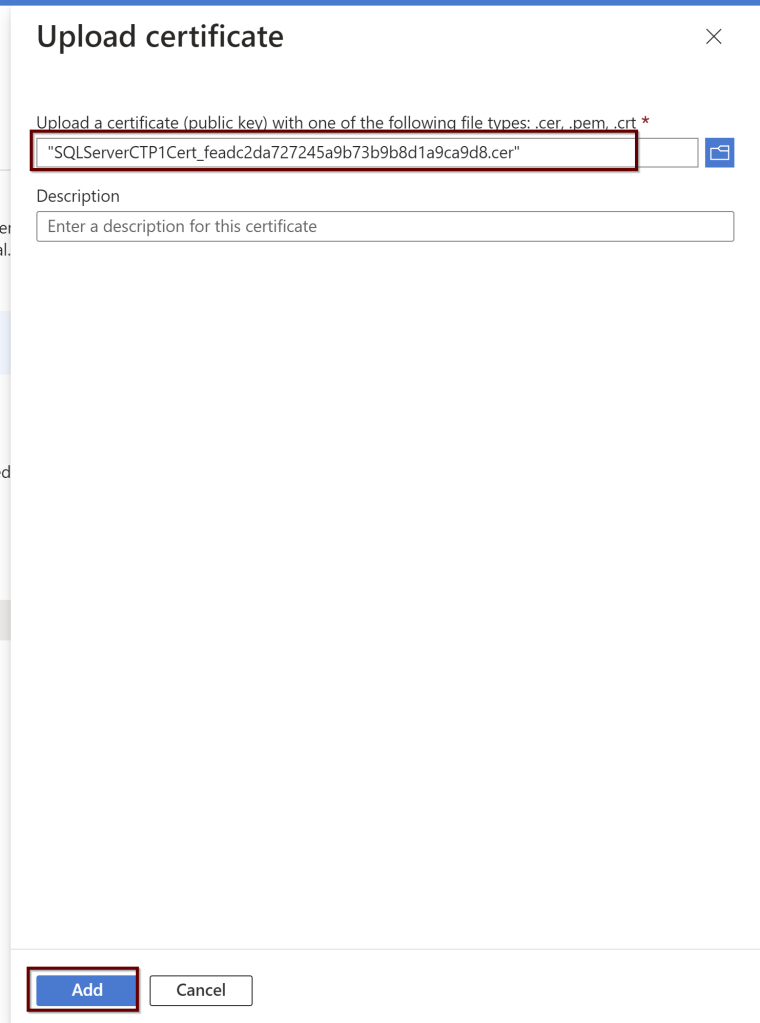
Upload the certificate from the downloaded location and click on add.
Next, go to the key vault where the certificate is saved to provide the permissions. Add Access Policies.
Click on the principal>give the computer name>click next> review and create.
3. Configure Azure AD authentication for SQL Server by creating the Custom-managed Cert
Click on the SQL Sevrer instance linked to the Azure Arc for SQL Server> go to the active directory>click on set admin>
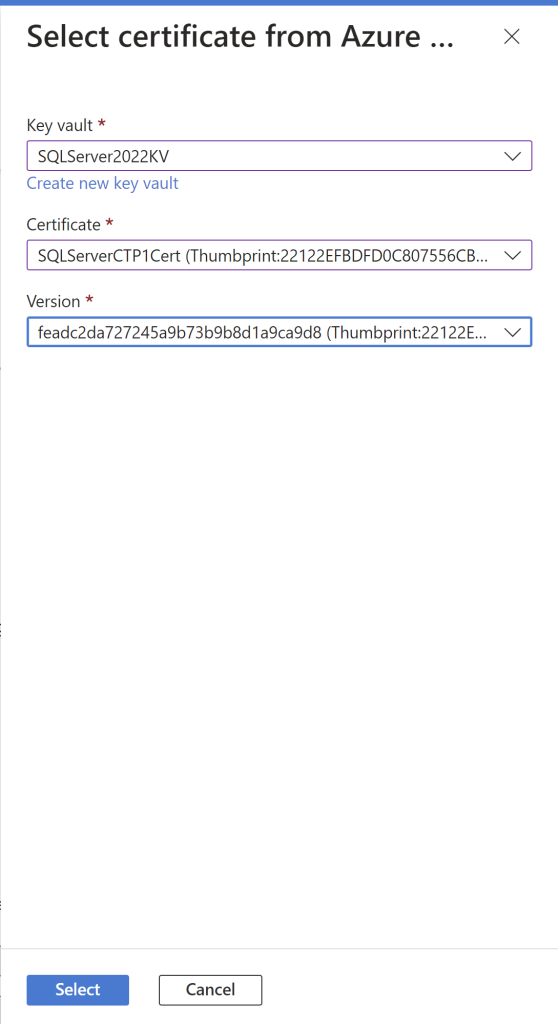
Select the Customer-managed cert and chose the certification. From the drop-down menu, you will see all the details. Choose the appropriate ones and click select.
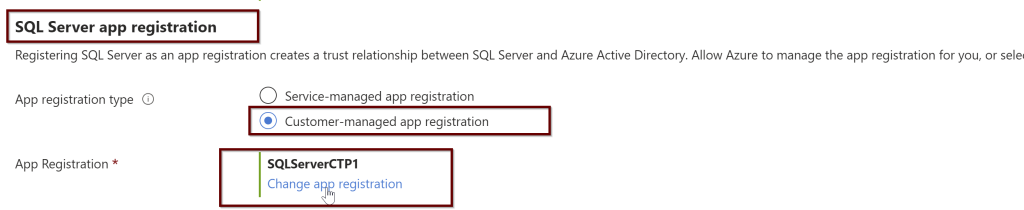
In the same way, you will also choose the SQL Server app registration.
Select the app registration>select app registration>select the app>select
After you have selected it, click on the save button at the top
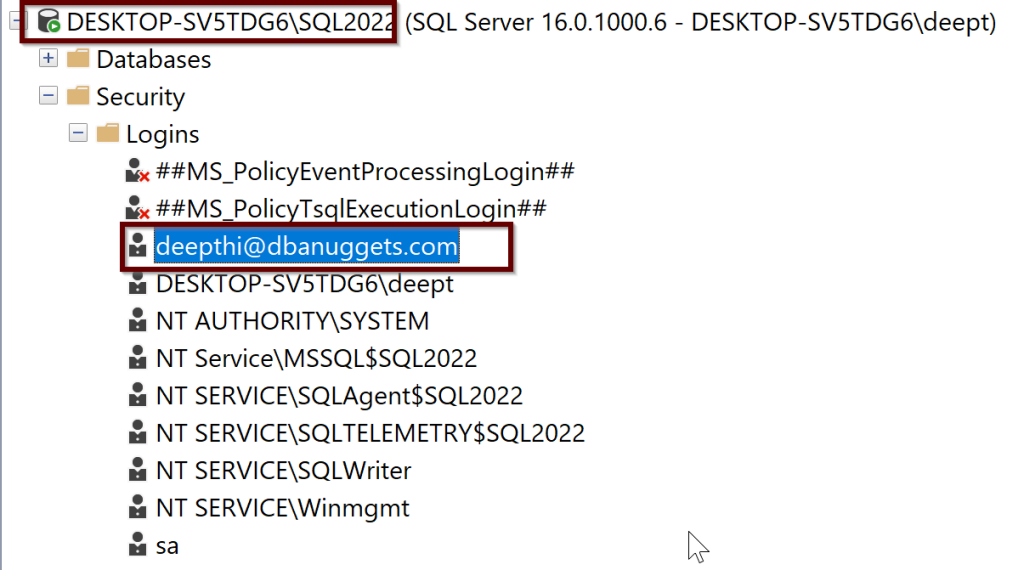
You should be able to see the login in the sql.server_principles on the server but it is not sysadmin yet.
You can either give the sysadmin permissions through GUI in ssms tool or you can use the below script. Here I am using my email credentials but you can replace that with your AD admin user email credentials.
ALTER SERVER ROLE sysadmin ADD MEMBER [deepthi@dbanuggets.com]
GO
4. Create logins
Once you give the sysadmin permissions to this account, it can go ahead and create any number of Azure AD logins. For example, I took some examples from Microsoft docs.
-- login creation for Azure AD user
CREATE LOGIN [user@contoso.com] FROM EXTERNAL PROVIDER;
GO
-- login creation for Azure AD group
CREATE LOGIN [my_group_name] FROM EXTERNAL PROVIDER;
GO
-- login creation for Azure AD application
CREATE LOGIN [my_app_name] FROM EXTERNAL PROVIDER;
GO
5. Connect with a supported authentication method
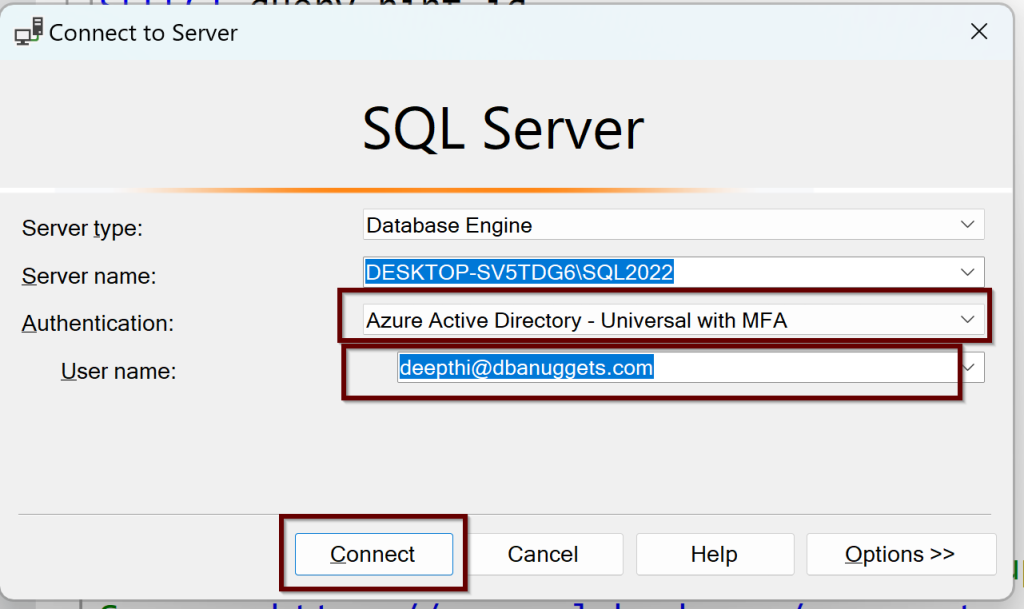
You can try to log in now using the Azure AD authentication from ssms tool shown below:
With the multi-factor authentication, you will need to login into Azure and you will be connected to SQL Server 2022 with an Azure AD admin login.
Summary
In this blog post, you have learned how to Create an Azure AD Authentication connecting to SQL Server 2022. We have seen creating the Certificate and the application automatically by Azure to add Azure AD admin to SQL Server but also we have learned how to manually create the Certificate in Key Vault and create an application as we try to add Azure AD admin to SQL Server 2022. Finally, we were able to connect to the SQL Server by using the Azure AD authentication using ssms tool.
Deepthi is the Founder of dbanuggets and a SQL Database Administrator. As a Microsoft MVP, she helps SQL communities by sharing her expertise in resolving SQL Server problems globally.
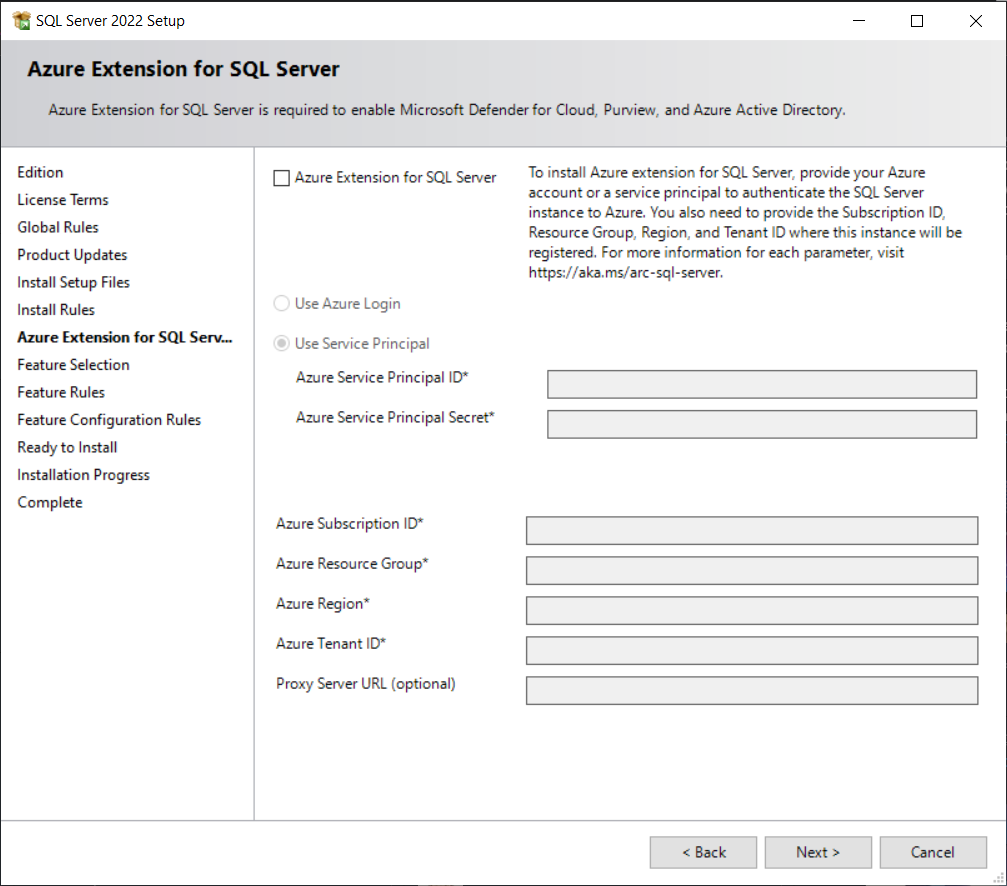
If you are selecting this option, be ready to have all the information shown below:
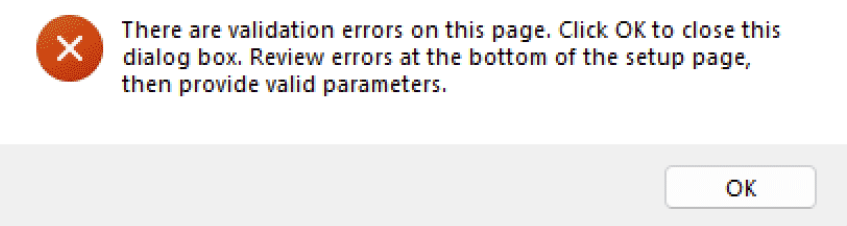
Failure to provide any of the below will throw below error:
I have seen the above error multiple times while I tried to enter the values. I believe that I provided the correct values but not sure if I was missing anything. I decided to install the SQL Server 2022 without including this extension from the GUI but instead install the Azure arc manually later. This blog post shows exactly the same. A step-by-step guide to install and configure connecting your on-prem SQL Server into Azure using Azure-arc.
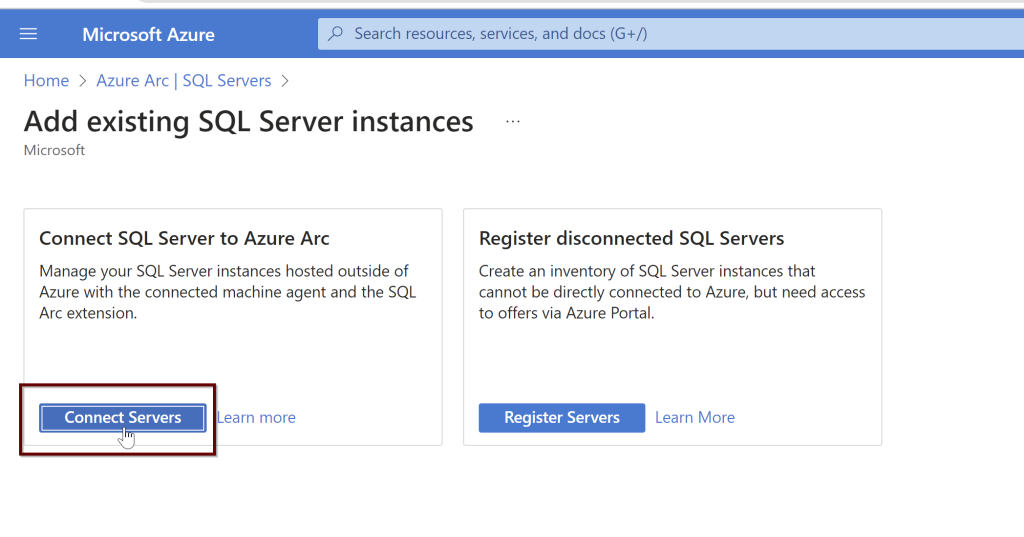
You need to have an active subscription to install Azure Arc connection to your SQL Server. In the Azure portal search bar, select “Azure Arc SQL” and select SQL Server – Azure Arc from the list.
Click on add
Under Add existing SQL Server instances> Click on Connect Servers
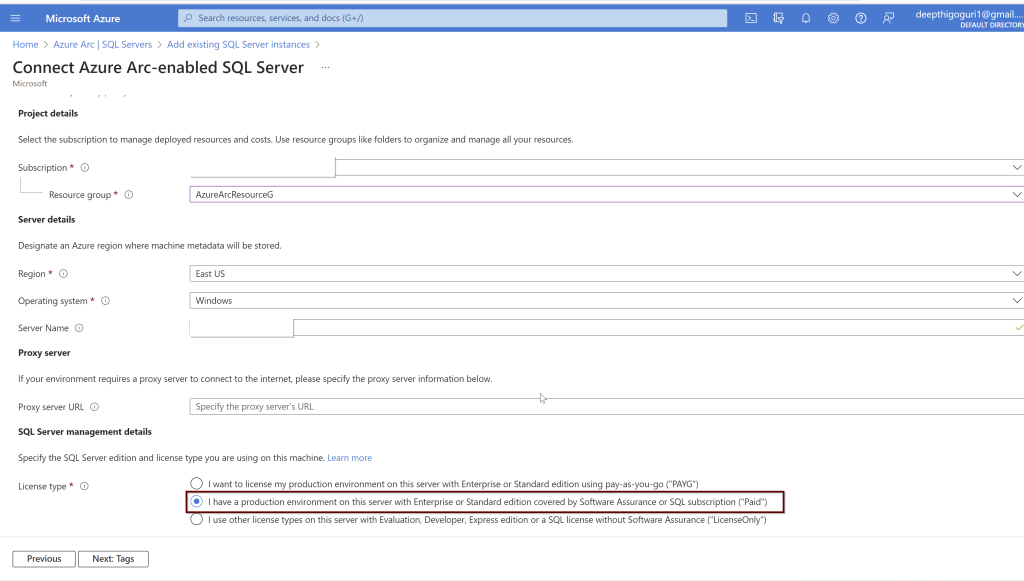
Check all the prerequisites are in place
Provide the subscription, resource group name, Region, Operating system, Servername (Hostname of the server which will include all the instances including the default instance of SQL Server), License type
By default, all the instances will be included as you provide the machine name but if you would like to exclude any instances, you can provide the name of the instance separated by a comma.
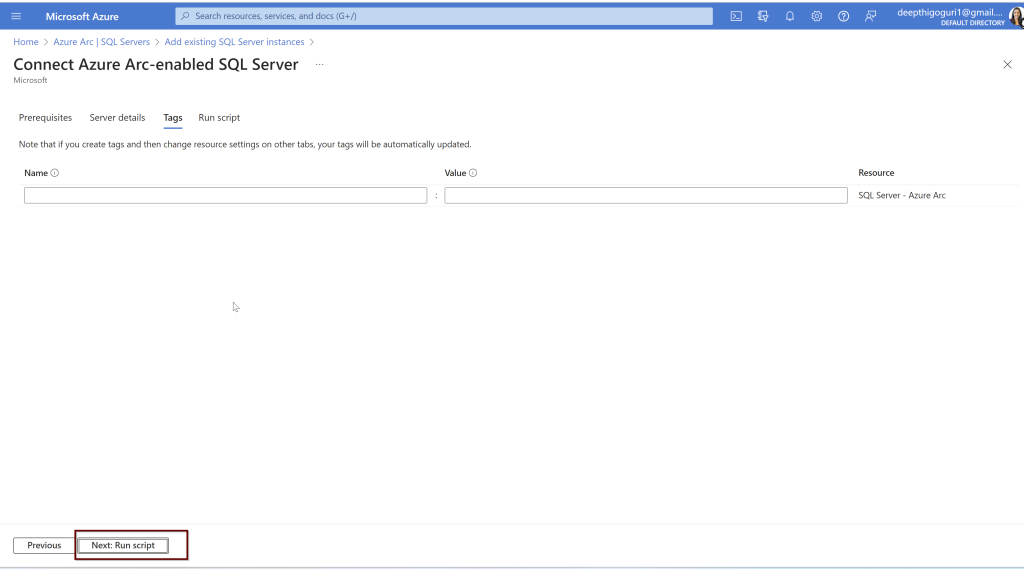
I am not going to provide any tags here, click next to run the script
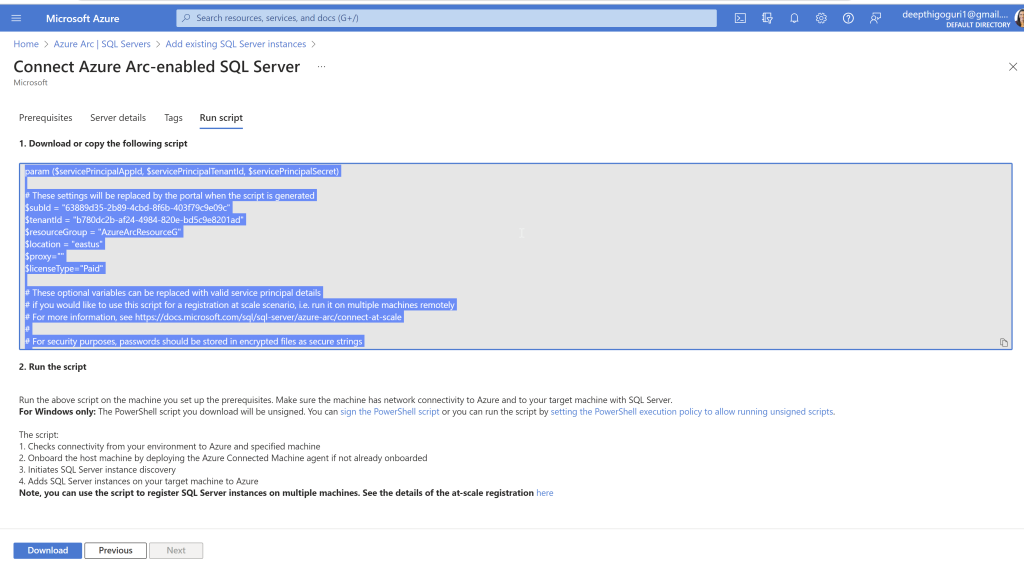
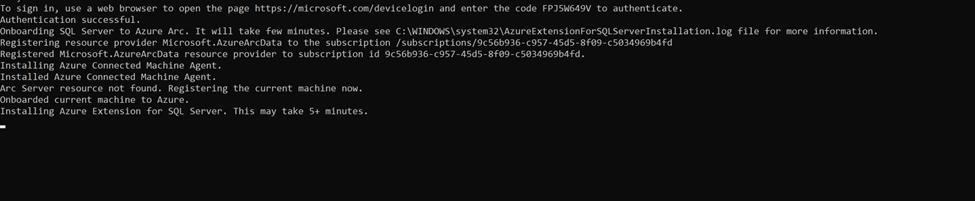
Observe this page properly. Copy the code.
In the second step, it shows “Run the above script on the machine you set up the prerequisites. Make sure the machine has network connectivity to Azure and to your target machine with SQL Server.
I used the execution policy for the current user to run the Powershell script. In PowerShell window, run the below script which will give the current user permission to execute the scripts.
Get-ExecutionPolicy -Scope CurrentUser
Now, Paste the code that you copied in the PowerShell and hit enter.
Azure extension for the SQL Server is installed. Check for the registered SQl Servers in Azure Arc.
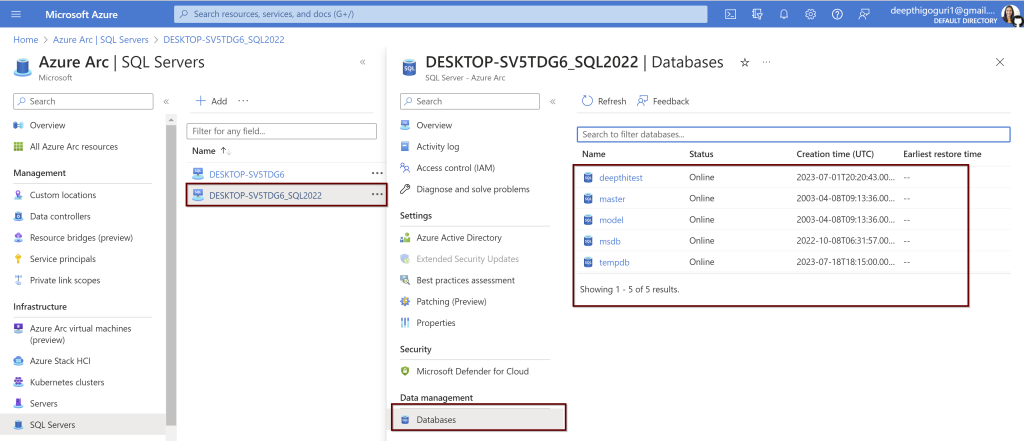
Click on the instance to see more details about the server. I have clicked on my named instance>databases from the left side blade. You can see the list of databases
I would like to connect to Azure from SQL Server 2022 on-prem. To do that, you need to enable Azure Active Directory. In the next blog post, I will explain how we can set up the AAD (Azure Active Directory authentication) to SQL Server 2022 and connect from your local SQL Server management studio to Azure.
Deepthi is the Founder of dbanuggets and a SQL Database Administrator. As a Microsoft MVP, she helps SQL communities by sharing her expertise in resolving SQL Server problems globally.
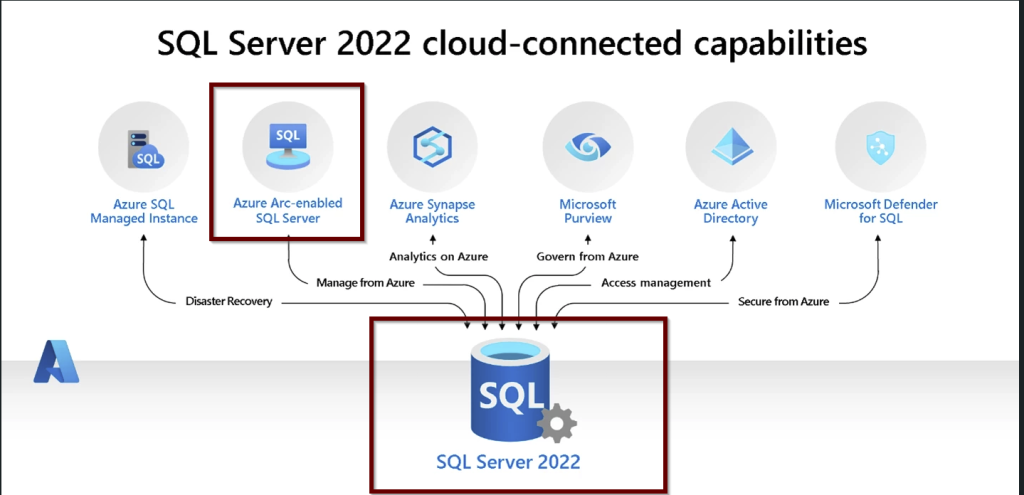
Azure Arc will offer the capabilities to manage your On-prem SQL Server instances, other Servers, and applications that are running outside of Azure. It is like a central location where you can see your resources and manage them from Azure. This is very useful when you want to know the inventory details of both your on-prem Servers and Azure resources if you are in using hybrid ways, i.e. having resources from different cloud providers or having resources outside Azure including On-prem SQL Servers.
Inventory includes the basic details of your Servers like the hostname of the machine where your Server is hosted, the name of the instance, version, edition, and amount of resources like CPU and memory allocated to the Servers. As you will be in Azure, take advantage of the Azure Resource Graph Explorer to get these details. You can create customized dashboards and create charts.
Reference: The diagram as shown on the Microsoft website demonstrates what the SQL Server inventory looks like using the Azure Graph Resource Explorer.
You can also get the best practices assessment after enabling the Azure Arc-enabled SQL Servers. This assessment will analyze the SQL Server configurations comparing the best practices based on Azure standards and provide recommendations.
Cost Savings
You can save money by using Microsoft Defender for Cloud after enabling Azure Arc-enabled SQL Server. Microsoft Defender for Cloud feature will do the Vulnerability assessment and threat protection. More on this topic, I have written a blog post here.
If you would like to use the Azure Purview feature, it becomes easier to use as the Azure Arc-enabled SQL server will come with access policies that will be helpful to connect to SQL Servers with ease.
The architecture of Azure Arc-Enabled SQL Server
Some important points to remember:
There are three important agents that are needed to enable the Azure Arc-enabled SQL Server.
Azure Connected Machine Agent – This agent will help manage the Windows and Linux machines hosting outside of Azure.
Azure Extension for SQL Server
Azure Monitoring Agent – The Microsoft Defender for cloud and best practices assessment needs this agent. This extension is needed to put the collected data in the log analytics workspace.
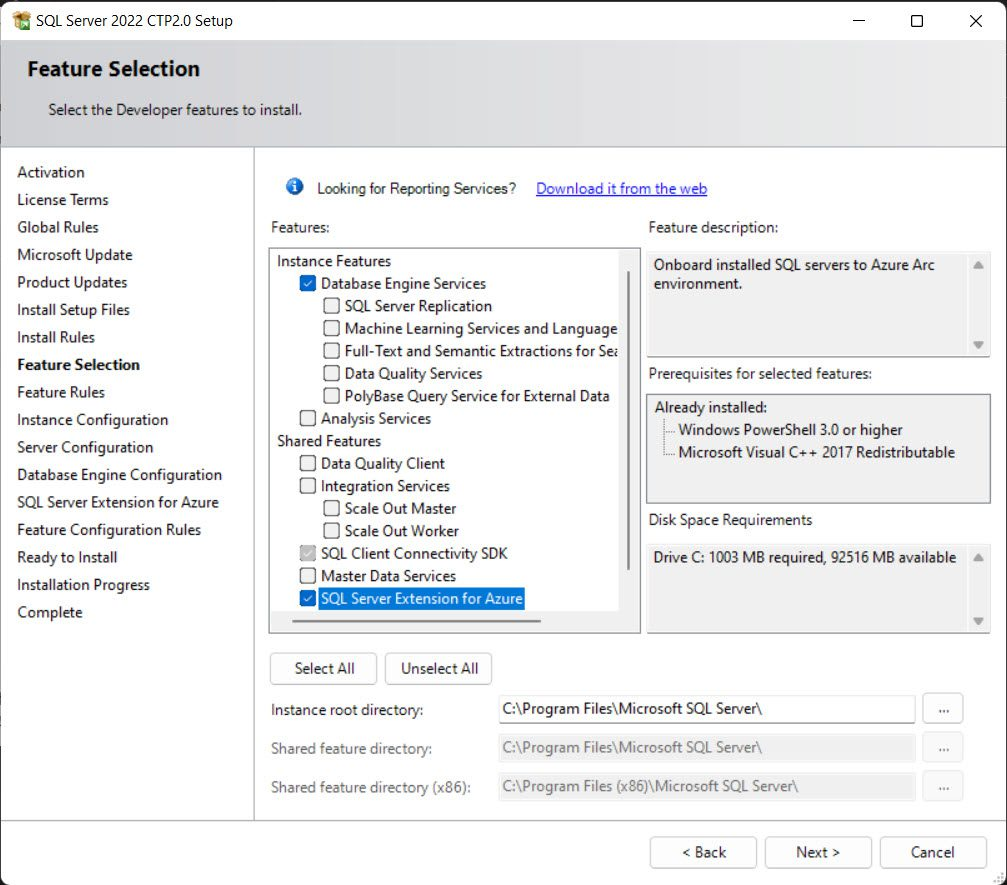
If you are installing the SQL Server 2022, use the Azure extension for SQL Server to connect to Azure. You will find this feature in the feature selection pane during the installation.
But even if you have this easy button to select and connect to Azure from SQL Server 2022, you can still install the Azure Arc-enabled SQL Server. You can install Azure extension for SQL Server from SQL Server 2012 and up.
Prerequisite Steps:
To enable the Azure Arc-enabled SQL Server, you need to have an account in Azure with a subscription that is active. You need to verify Arc-connected machine agent network requirements. The Arc agent needs to be running in Full mode. You will also need to connect to Azure Arc data processing service by opening up the outbound rules on each of the servers (virtual or physical) (Source) to URL: san-af-<region>-prod.azurewebsites.net and to port 443.
Also, you need to register for the resource providers –
Microsoft.AzureArcData and Microsoft.HybridCompute – you can do the installation very easily by connecting to the specific subscription and under the settings >select resource providers and register these two providers.
Service Principal Permissions needed to install the Azure Arc-enabled SQL Server
Read permission to Subscription
Permissions to Azure resource group –
Azure Connected Machine Onboarding role
Microsoft.AzureArcData/register/action
Microsoft.HybridCompute/machines/extensions/read
Microsoft.HybridCompute/machines/extensions/write
If you are manually installing the agent or using the command line interface to install the agent, you need to have administrator permissions on the machine you would like to install. This can be a Windows or Linux machine.
In case of deploying at scale on multiple Servers – The service principal needs to have a User Access Administrator role to install the system-managed identity and Resource policy Contributor role assignment at the resource group level or at the subscription level.
To check for the limitations at the subscription or resource group limitations, please read this post here.
In the next blog post, we will learn how to install the Azure Arc-enabled SQL Server using the Azure portal so you can start to see all the Servers outside of Azure in the Azure portal which makes the management and identification of your inventory easy.
Deepthi is the Founder of dbanuggets and a SQL Database Administrator. As a Microsoft MVP, she helps SQL communities by sharing her expertise in resolving SQL Server problems globally.
I know it’s been a while since I blogged. It’s been busy at work and I felt I had to take some time off. Firstly, I would like to apologize to the regular readers of this blog and I would like to thank some of them for remembering me and reaching out to me asking to write. Thanks for checking on how I was doing.
As a continuation of the Quick track series on beginner’s guide to Azure SQL, this post is about Auditing in Azure SQL.
As you all know how crucial it is to Audit activity on the Server for both prod and non-prod environments, turning on the auditing in Azure SQL is pretty simple and the results we see in the audit log are similar to the logs we see on-prem. The difference is where we save the audit data in Azure.
You can enable the auditing at the Server level and at the database level just like the way we can audit SQL Server on-prem. If you would like to enable audit at the Server level in Azure, it will automatically audit all the databases under that Server. If we allow the auditing at the server level (logical Server for Azure SQL Databases) and also at the database level, we might get double the amount of collected audit data as it contains the same data twice. Always chose the Storage account if you wanted to audit the data at the Server level. If you just want to collect the audit data on one or some databases only, you can disable the logical Server level audit and enable the Auditing at the database level.
If you want to specifically use a different storage method from the other audited databases or wanted to modify the default action policy groups to any specific databases, you can choose the database level auditing instead of the Server level auditing. By default, the login activity, queries, and stored procedures are audited.
The default audit policy for the Server and the Azure SQL databases includes
BATCH_COMPLETED_GROUP –
SUCCESSFUL_DATABASE_AUTHENTICATION_GROUP
FAILED_DATABASE_AUTHENTICATION_GROUP
To enable the Auditing at the logical Server level- Go to the auditing blade on the left under the logical Server> Enable SQL Server Auditing> turn on.
Chose the audit log destination among the storage/Log analytics/Event Hub. You need to select the subscription and provide the log analytics workspace. If you already have one, select it or create one right here if you do not have one. If you need any kind of support from the Microsoft support team in the future, make sure to enable the option “Enable Auditing of Microsoft support operations” so they can have access to your logs when they work with you.
If you are choosing Server level auditing, then select the storage as destination and you will have to choose the authentication type: Managed identity (system-assigned and user-assigned managed identity is supported as per Microsoft). You can choose the retention period here as well. 0 represents unlimited retention. Changes made to the retention period will only effect the future collection of the Audit data. Any collected information while it was set to unlimited will be always retained.
To specifically enable the auditing at the database level, go to the database and select the auditing blade on the left side> Enable Azure SQL Auditing> Turn on
To view the audit logs of the database>go to the auditing blade on the left side>click auditing>click on view audit logs.
You can see the audit logs of the database. You will see the query where you can edit and filter the results.
If you would like to modify or view the audit policy through Powershell, there are some command lets you can use. Source: Microsoft
Get-AzSqlServerAudit – Will give the Server level audit policy
Set-AzSqlServerAudit – You can create or modify the Server audit policy
Remove-AzSqlServerAudit – use to remove Server audit policy
Get-AzSqlDatabaseAudit – Will give the database-level audit policy
Set-AzSqlDatabaseAudit – You can create or modify the database audit policy
Remove-AzSqlDatabaseAudit – use to remove the database audit policy
Here is an interesting question asked by a user on how to filter out specific login as it causes a huge amount of data. You can find the resolution here.
You can also check the audit logs from the home blade>monitor>logs. You can see the same audit information here.
For more examples on how to add or modify the auditing policy, here is the article from Microsoft you can follow.
Hope this blog post gave you an overview of auditing in Azure SQL.
Deepthi is the Founder of dbanuggets and a SQL Database Administrator. As a Microsoft MVP, she helps SQL communities by sharing her expertise in resolving SQL Server problems globally.
Azure Defender for SQL, once you enable it will alert you for any SQL injection attacks, brute force attacks or any breached identities trying to access the data of your database. It also provides the vulnerability assessments. Vulnerability assessments give you alerts about the configurations of your database. If your database configuration is not following the standards of Azure, you will receive the alerts in the vulnerability assessment report.
You can enable the Azure Defender at the subscription level or at the Server level or at the resource level as well. Under the recommendations in the security center in the Azure portal, check for the Remediate security configuration. This will show if the Azure defender is configured properly.
Azure defender for SQL consists of two features – Advanced Threat Protection and Vulnerability Assessment.
Advanced Threat Protection
Threat protection will send the alerts if there is any malicious activity going on against your database. You will receive alerts if there are any SQL injection attacks, any suspicious login attempts from new locations.
Vulnerability Assessment
Vulnerability assessment will check for the security misconfigurations based on the Azure standards. It will provide a baseline based on the standards which you can later accept and add these baselines based upon your environment. It will also provide the actionable steps to take and remediate the alert.
Azure defender supports Azure environments and also hybrid environments. For the complete list of where the Azure defender is supported, please check the Microsoft article here.
You can view all the defender collected information in the centralized view at Azure Security Center.
Vulnerability assessment requires the storage account for the PaaS service. This can be setup at the logical SQL Server level. For the IaaS service, you don’t have to specify the storage account separately.
Once you turn on the Azure Defender, we need to give sometime to collect the information and scan the system for any vulnerabilities. At the server level, Go to the Microsoft Defender for Cloud. You can also open at the resource level as well.
To view the details, click on the additional recommendations.
You can also see the recommendations from the resource level as well. Click on the Microsoft defender for cloud from the database level.
Scroll down to see the details
Let’s see the example of the first vulnerability assessment finding. The security check shows Database owners are as expected. Click on the finding to see more details.
You can either look into the details and add the recommendations to the baseline or ignore. This is completely based on your needs and your current environment.
Azure Sentinel
Azure sentinel will help in identifying the security incidents that we need to investigate. You need to create a log analytics workspace to add to Azure sentinel. Multiple data connectors can be used to connect and collect the information from these different connectors and analyze the data for the security incidents.
You can use different dashboards to view the collected data and alerts. For example, you can use the audit logs dashboard to view more details on the alerts. You can setup the alerts for the events. You can also create the playbooks to automate the response to specific alerts using the logic apps.
Deepthi is the Founder of dbanuggets and a SQL Database Administrator. As a Microsoft MVP, she helps SQL communities by sharing her expertise in resolving SQL Server problems globally.
Data needs to be protected no matter where it lives, On-prem or in Azure. Data can be protected by using the encryption that Azure provides. What are the types of encryption we have in Azure?
Encryption in Transit: The data needs to be protected as it moves all the way from the database to the client application and vice-versa. The encryption is always by default enforced by TLS (Transport Layer Security). Making sure your application supports the TLS version you choose on your server is important. If for example, you chose the TLS version 1.2 on your server and your client application only supports the 1.2 TLS version, your application cannot connect to the server.
As a best practice from Microsoft, client applications should have the encryption enabled on their connection string and not trust the Server certificate.
Encryption-at-rest: Data at rest on the disks- which includes the data files, log files and backup files. These are encrypted with the technology called Transparent Data Encryption.
This option is enabled by default as well. As the data is moved in and out of the drives, the data is being protected through the transparent data encryption. By default, Microsoft is going to manage the keys known as Microsoft-managed keys but also you can choose bring your own keys (BYOK). In the default option Microsoft-managed keys, the responsibility of the key generation, key rotation and the management of these keys are taken care by the Microsoft. All these keys need to be stored in the Key vault which is a Microsoft product. In the second option BYOK, the customer is responsible for the management of the keys including the key generation, key access to the users and key rotation. The third option we have is Hold your own key (HYOK) which is a IaaS offering only where the key generation including the key management and storing the keys is totally taken care by the customer.
Double layer of encryption is where you can chose the TDE along with the infrastructure encryption (volume encryption). This is an additional layer of security for your data on disk. The second layer Infrastructure encryption is optional choice.
In the case of customer managed key, the server identity should have the access to the key vault. So, when the server wants to encrypt and decrypt the data on the drive, it will use this key. The first step to create the customer managed key is to create the Key Vault if you do not already have one.
Once you created the Key vault, choose the customer managed key. To select a key, first we need to create a key that is saved in the key vault. Here I have created two keys.
Then go to the access policies on the Key vault and give the server (Securitydemo) enough permissions to access the key. That requires Wrap and unwrap permissions.
Now go to the transparent data encryption and choose the key by clicking on the Select a key and then click on change key.
Choose the key you have created and click on select
Once you select the key, click on Save on the transparent data encryption page.
Encryption-in-use: It encrypts the data during the query processing and the technology used is always encrypted. This is the client side encryption technology. Cryptographic keys that are used to encrypt and decrypt the data are never shared with anyone. The SQL client driver in between the client application and the database will serve as the mediator to encrypt and decrypt the data as the data moves in and out of the database. Initially only the equality searches were only supported but to add more functionality in supporting the range queries, pattern matching, sorting, indexing and more operations, a new technology is being introduced in SQL Server 2019 known as Secure Enclaves.
Secure Enclave is a part of memory in the SQL Server that no one can access and this part of memory is used to process the computational operations involving the sensitive encrypted column. In this part of the memory, the secure enclave will have the data which is decrypted safely and queries can be processed here.
How do we know that the Secure enclave is secure to process the sensitive data? There is a service known as Microsoft Azure attestation which will check if the secure enclave is safe and process the queries. By using the Secure Enclaves, even the windows administrators or DBA’s cannot access the sensitive data on always encrypted columns.
Dynamic Data Masking
Dynamic Data masking is a protection of the data from the application users who should not have access to specific information. This is not the encryption where the files are encrypted.
This is limiting the access to the data where the data is masked on the fly when the data is moved from the database to the application. As the data reaches to the application, only the needed information needs to be shown to the application users. You can use the custom built functions or create the custom functions to mask the data.
Ledger
Ledger is a technology which uses blockchain technology to protect the data tampering from the privileged users who have access to the sensitive data. This involves the ledger tables built in as you enable this feature on the database.
Updatable ledger tables allow to capture the data of updates and deletes. The updated rows will be stored in the history tables. The database digests using the block chain technology is saved in the trusted Azure storage where database digests are used to verify the database whether the data in it is being tampered.
Because the Ledger captures all the changes happening to the data in the database and if the tampering happens through application, these changes can be also be identified through the ledger views. This is one of the great features in Azure in protecting the data.
This blog post covered multiple data protection technologies available in Azure. In upcoming blog post, we will learn about the next security layer Threat prevention and detection.
Deepthi is the Founder of dbanuggets and a SQL Database Administrator. As a Microsoft MVP, she helps SQL communities by sharing her expertise in resolving SQL Server problems globally.
Authentication and Authorization are the two things that we need to get familiar with when we learn about the Access management.
Authentication is proving that we are the same user who we say we are. Below are the authentication methods available in Azure.
SQL Authentication: Azure SQL Database and for the Managed instance (MI) supports SQL authentication. This is just like any regular SQL Authentication account with username and the password. When you create the server, you will need to create the SQL authentication account which will become the server admin that will have database owner on all the databases. This account can create other SQL authentication accounts on the server as well.
Azure Active Directory: There is a centralized location for the identities and permissions to database users to be stored for the Azure active directory authentication. As the password is only stored at one location, it becomes easier for the administrators to manage the identities and for maintaining the passwords. This authentication is supported for Azure SQL database, Managed instance (MI) and Azure synapse analytics. The Active directory admin will become the server admin where to create other AD logins, only the Active directory admin can create the other AD accounts having permissions to Azure SQL database. Multi factor authentication option is available for this option. Authentication app can be used as the multi factor authentication where it provides phone call/text message/authentication app to confirm the identity. This authentication type will use the contained database users to connect to the database to access the database objects.
Active directory will support the users with the login id and password, Integrated (single sign-on) authentication used when there is a trust built between the Active directory and the Azure AD using windows authentication. Universal/interactive with multi factor authentication is where the password is generated dynamically. There is a token authentication where a token is generated from Azure AD and as we pass this token to the SQL. Source:here.
One of the important point to remember is, the Azure active directory admin has to create the Azure active directory login. SQL authentication logins cannot be created by Azure AD logins. The other type of users that the Azure AD supports are individual user accounts, group accounts, service principles.
To create the Azure AD account, you can create the account by running on virtual master database. please see sample code to create Azure AD login here.
Lets learn a bit about the differences in the logins and users in between the managed instance and Azure SQL database
Managed Instance: You can create the Azure AD server admin along with the SQL server admin. You can create the SQL logins even when you only enable Azure AD only authentication but you cant connect until you enable the SQL authentication. You can create the SQL or the Azure AD logins, Database users and database contained users. You can also create the Server trust group for the distribution transaction scenarios between the two instances.
Azure SQL Database: You can create the Azure AD Server admin along with SQL logins. Additionally you can have roles like loginmanager and dbmanager for limited server admins. You can create the users associated with the SQL logins, create contained users including Azure AD. To create these contained users, the user must be login using the Azure AD server admin.
There are two configuration options for the authentication:
Cloud only option- where you can create the AD azure accounts with out having them connected to the on-prem servers or you can federate services with single sign-in option, Azure AD storing password as a Hash and Azure SQL passthrough with single sign-on is where the password stored in on-prem.
Azure SQL Authentication supports Azure AD authentication or SQL authentication or Azure AD only authentication (disables the SQL authentication automatically).
Azure Role-Based Access control (RBAC) is what can and cannot be done as a user. We have built in roles in azure where we can assign access to the users and groups permissions all the way from the subscription to the individual resource groups and resources. These permissions can be applied to each level of the hierarchy of resources.
There are three RBAC built in roles that we need to remember:
Owner: Owner can do everything and assign other users as well.
Contributor: Can only modify but cant assign other userd
Reader: Can only read the assigned resource
Custom roles can also be created. Once these roles are created, you can assign the users to these groups.
For the SQL permissions, you can use the built in roles or the custom roles making sure you give the least privileges needed. To provide the least privileges, for the azure SQL database the AD user will be assigned to the database user which will have permissions to the database role connecting to the database. With the Azure SQL managed instance, the login at the server level will be associated and connected to the database user which is assigned to the database roles.
The other important thing to remember is that when the owner of the tables and the views objects are the same, we can only grant the user permissions to access the views instead of granting the permissions to tables for security reasons but the user can now access the tables through the views without having to have the access to the tables. This is called Ownership chaining.
Row level security: Securing the data by only providing access to the rows that the users are allowed to see. This comes under the least privilege access as well.
In order to implement the row level security, we need to create the SQL object known as security policy which is assigned to the table where it will filter the rows and provide only the information that is allowed to share.
I did not show any code examples here in this post because we already have several resources in place showing the examples of how to create the logins and users. Please check here and here
In the coming blog post, I will be writing about threat protection.
Deepthi is the Founder of dbanuggets and a SQL Database Administrator. As a Microsoft MVP, she helps SQL communities by sharing her expertise in resolving SQL Server problems globally.
Securing something you built is as important as creating it. Any resource that you create needs to have in depth layers of protection to save it from the bad eyes.
Let’s take the analogy of the Bank systems where you save your money and other valuables. Starting from the parking lot of the bank till the door of the bank vault where the actual money is stored, there is multi layer of security. Cameras, digital locks, padlocks and more locks to reach the money. This is in depth security system. Breaking any layer can only result in more effort to crack an another layer which is even more difficult.
Same goes with the Data. No matter you are on-prem or in the cloud, Data needs to be protected and there are no exceptions.
Securing data in Azure is an important part and there are different security layers available in Azure. Below diagram shows you the different layers of Security we have in Azure to reach the customer data.
In this post, let’s focus on the Network security.
The below table will give an idea about different Network security options available and the differences among them.
Allow Access to Azure Services
Firewall rules
Virtual network rules
Private link
Least secure
Secure with firewall
Private IP address of the Azure VM
Most secure
Anything in Azure can connect
Services with added Firewall rules can connect
Any resource in that VN can access Azure SQL
Block all public access
Outside of Azure cannot connect
Allow on-prem connections
Apply virtual network technologies to connect on-prem
Private IP address within a specific virtual network
Public IP address
Public IP address
Private IP address within the VN
Private IP address
DNS hierarchy is public
DNS hierarchy is public (region, cr)
DNS hierarchy is still public (region, cr)
DNS hierarchy shows private endpoint
In any specific region you have hosting the Azure SQL Databases, your client can connect to Azure SQL database using the Gateways having the public ip addresses. Gateways are the intermediate layer in between the Azure SQL database and the client. Client can connect to Azure SQL database through these gateways in two ways.
Proxy: We can understand this by simple analogy. You want to visit your friend’s apartment frequently but at the security gate, the watch man asks you several questions where you need to prove your authenticity to enter into your friend’s home every time you want to visit him. That is the proxy mode. Here, the DNS will resolve from one of the multiple gateways through port 1433. Each time the client want to connect, the gateway will act as a proxy in between to connect to the database. Proxy mode is the default mode and if you are trying to connect from outside Azure.
Redirection: You want to visit your friend’s apartment frequently and this time, you will receive additional key to the apartment at the entrance as you prove your authentication. Once you receive the key, you can directly go to the apartment with out any intermediate layer of security check at the gate. In the redirection mode, a redirect token is assigned when the client connects to the gateway and all the connections made to the database next doesn’t have to pass through the gateway. The redirect token contains the ip address of the database and the port in between the range 11000 to 11999. Redirection mode is default if you are trying to connect to the database within azure.
These gateways are known as data slices when they are logically grouped together. These data slices are used for the load balancing.
Let’s learn about each of the network security layer:
1. Allow access to Azure Services: Anything in azure can connect to your database if you enable this option. Any azure resource from any subscription and from any region. On-prem Servers cannot connect using this option. This option is a kind of the firewall rules where the start and end ip addresses were all zeros.
2. Firewall rules: These are the firewall rules that you create like any other on-prem Servers. By adding the client ip addresses here in the firewall rules, the client can connect to the Azure SQL database. On-prem servers can connect to Azure by using this option.
3. Virtual network rules: Clients from the specific virtual network subnets can connect to the Azure SQL through the private IP address.
4. Private Link: Private link is creating a private ip address from the virtual network which can connect to your database privately. Internet will be disconnected here. To create a private endpoint, we need to know what resource type you are creating the private endpoint for. It can be Azure SQL Database or the storage account, then on which virtual network and subnet we are going to create this endpoint.
Here is the youtube link you can follow to create a Private link for your database.
In the next article, we will be learning about the next security later, Access Management.